
Brand Assets
Configure your brand identity—logo, colors, and messaging—to personalize email campaigns and maintain consistent branding across all communications.
What are Brand Assets?
Brand Assets are the visual and textual elements that define your brand identity in email campaigns. Instead of generic emails, your campaigns display your logo, brand colors, company information, and messaging—making every email feel professional and authentic.
Brand Assets include:
Logo: Your brand logo displayed in email headers
Brand Colors: Up to 4 colors for email styling
buttons, headers, accents
- Brand Information: Company name, website, offering type (Service/SaaS/Product)
- Call-to-Action (CTA): Primary action URL and button label for campaigns
- Value Propositions: Key benefits you offer to customers
- Additional Content: Service/feature bullets, special offers, case studies, contact info
All brand assets are automatically used in email templates as variables like {{business_name}}, {{value_proposition}}, and {{cta_label}}—personalizing every email you send.
Before You Begin
- Active FiveBucks project with Lead Generation enabled
- Your brand logo file (JPEG, PNG, WebP, or SVG, max 5MB)
- Brand color hex codes (e.g., #FF5733) or color picker access
- Company information and website URL ready
Navigate to Brand Assets
From your dashboard, click Lead Generation in the sidebar, then click Brand Assets in the submenu.
Loading image...
You'll see the brand assets configuration page with multiple sections for different asset types.
Upload Your Brand Logo
Your logo appears in email headers, giving campaigns a professional, branded look.
Loading image...
To upload your logo:
- Click the "Upload Logo" button or drag and drop your logo file into the upload area
- Select your logo file from your computer
- The system validates the file (see requirements below)
- Click "Upload" to save
- Your logo appears in the preview
Logo Requirements:
- Supported Formats: JPEG, PNG, WebP, SVG
Maximum File Size: 5MB
Recommended Dimensions: Square logo (1:1 aspect ratio) works best for email headers
Transparency: PNG and SVG support transparent backgrounds
Loading image...
Pro Tip
Delete or Replace Logo
To remove your current logo:
- Click the "Delete Logo" button below the logo preview
- Confirm the deletion
- The logo is removed from Supabase storage and all future email campaigns
To replace your logo:
- Simply upload a new logo—the system automatically deletes the old logo and replaces it with the new one
Note
Configure Brand Colors
Set up to 4 brand colors that style your email campaigns—buttons, headers, footers, and accent elements.
Loading image...
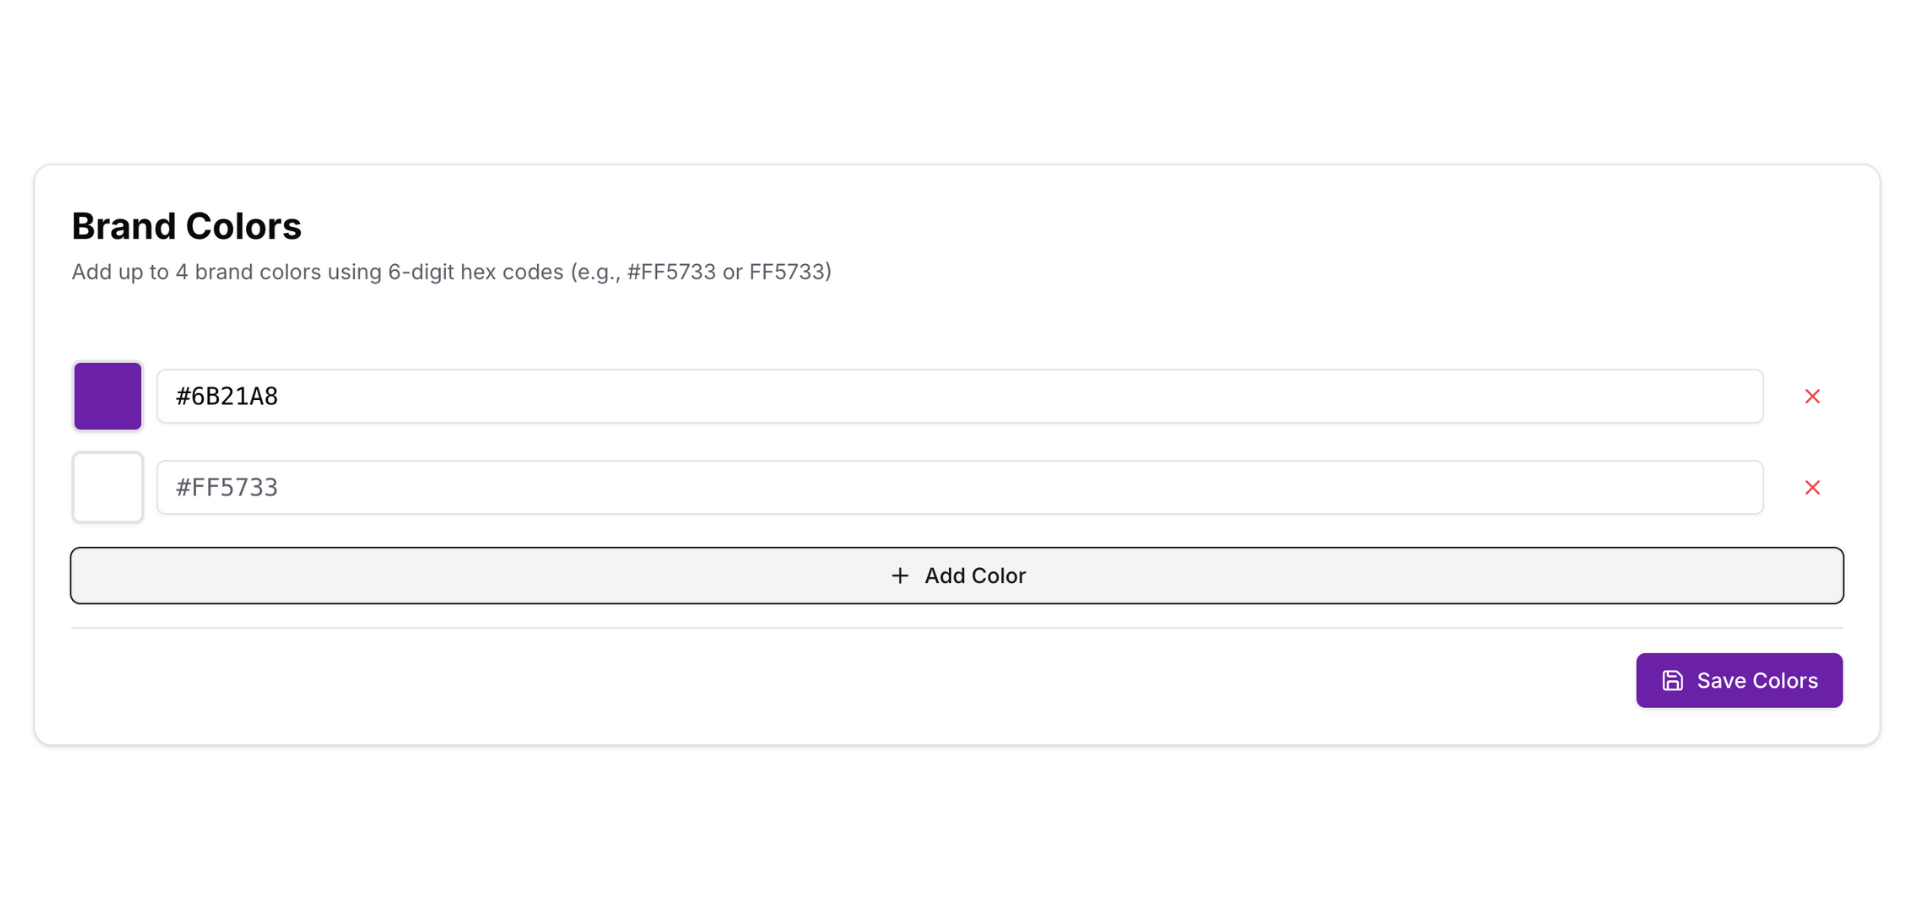
To add brand colors:
- Click a color slot (up to 4 colors)
- Use the color picker to select a color, or enter a hex code (e.g.,
#FF5733) - The color appears in the preview
- Repeat for additional colors (minimum 1, maximum 4)
- Click "Save Colors" to apply
Where brand colors are used:
- CTA Buttons: Primary color for call-to-action buttons
Email Headers: Background or accent colors for headers
Footers: Footer background or text colors
- Links: Hyperlink colors
- Accent Elements: Dividers, borders, highlights
Loading image...

Pro Tip
Enter Basic Brand Information
Provide core brand details that personalize email content and templates.
Loading image...
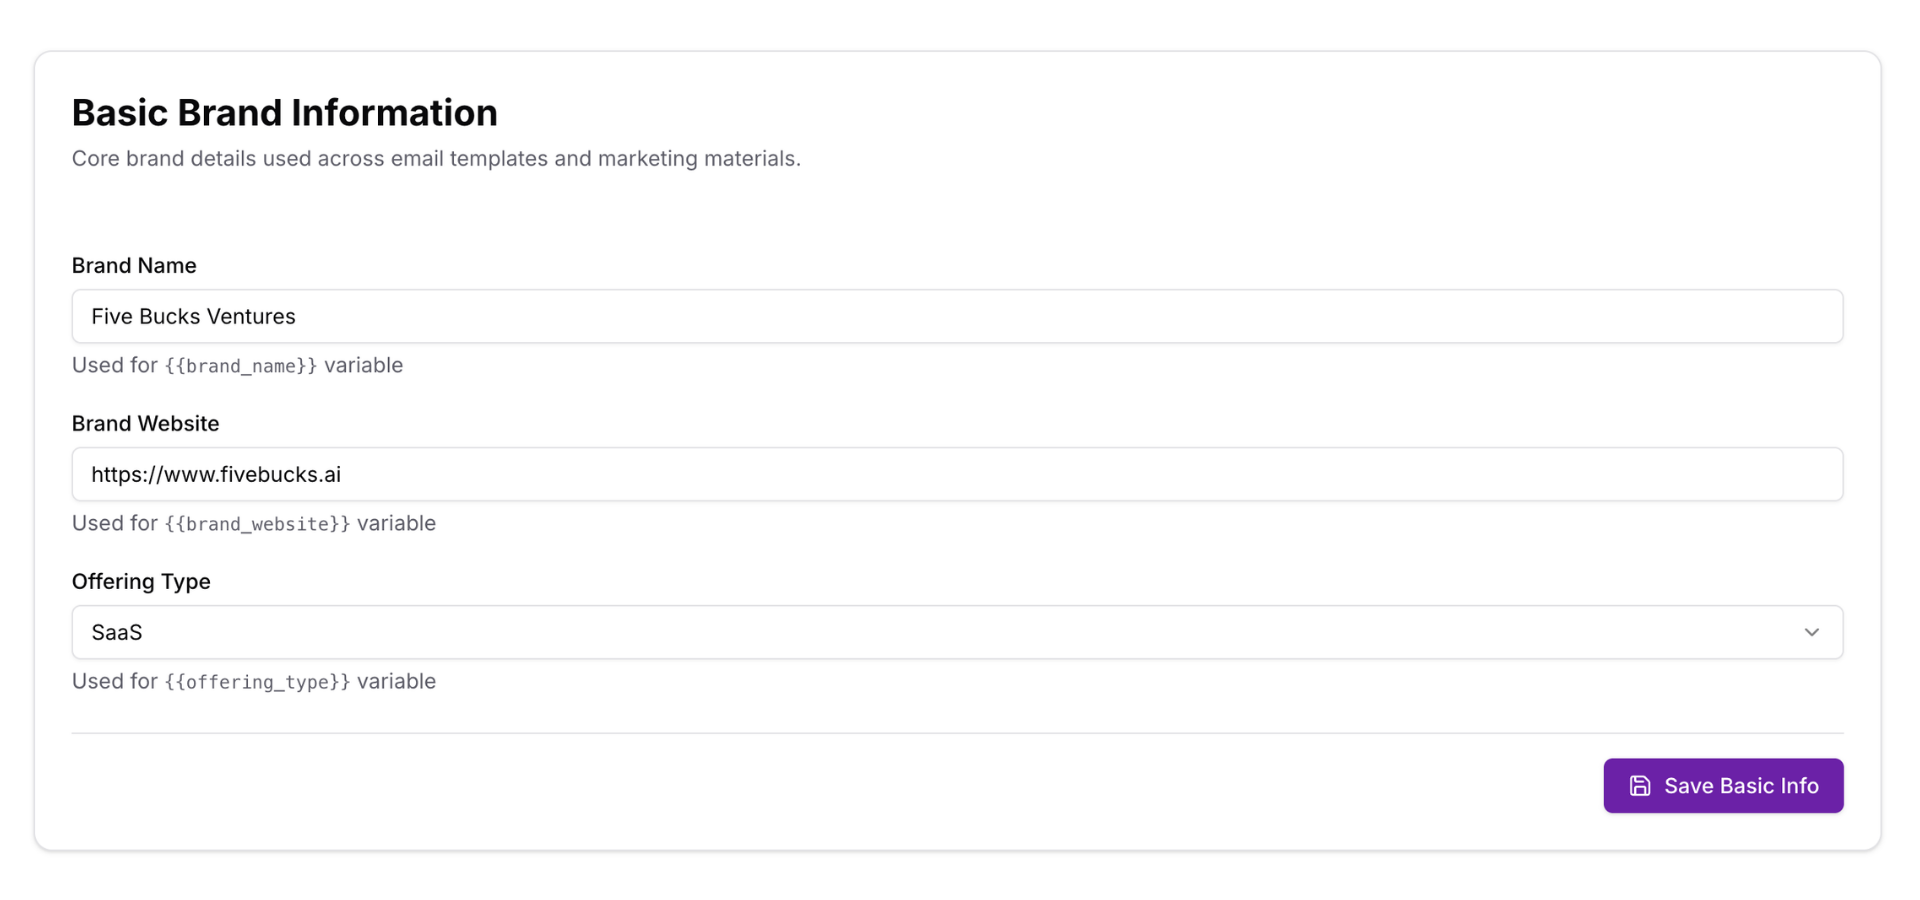
Required fields:
- Brand Name: Your company or brand name (e.g., "Acme Corp")
- Brand Website: Your primary website URL (e.g., "https://acme.com")
- Offering Type: Select one:
Why offering type matters:
- Determines which bullet sections appear (Step 7)
- Service → Shows "Services Bullets"
- SaaS → Shows "Features Bullets"
- Product → Shows "Top Products Bullets"
Note
Configure Call-to-Action (CTA)
Set your primary CTA—the main action you want email recipients to take.
Loading image...
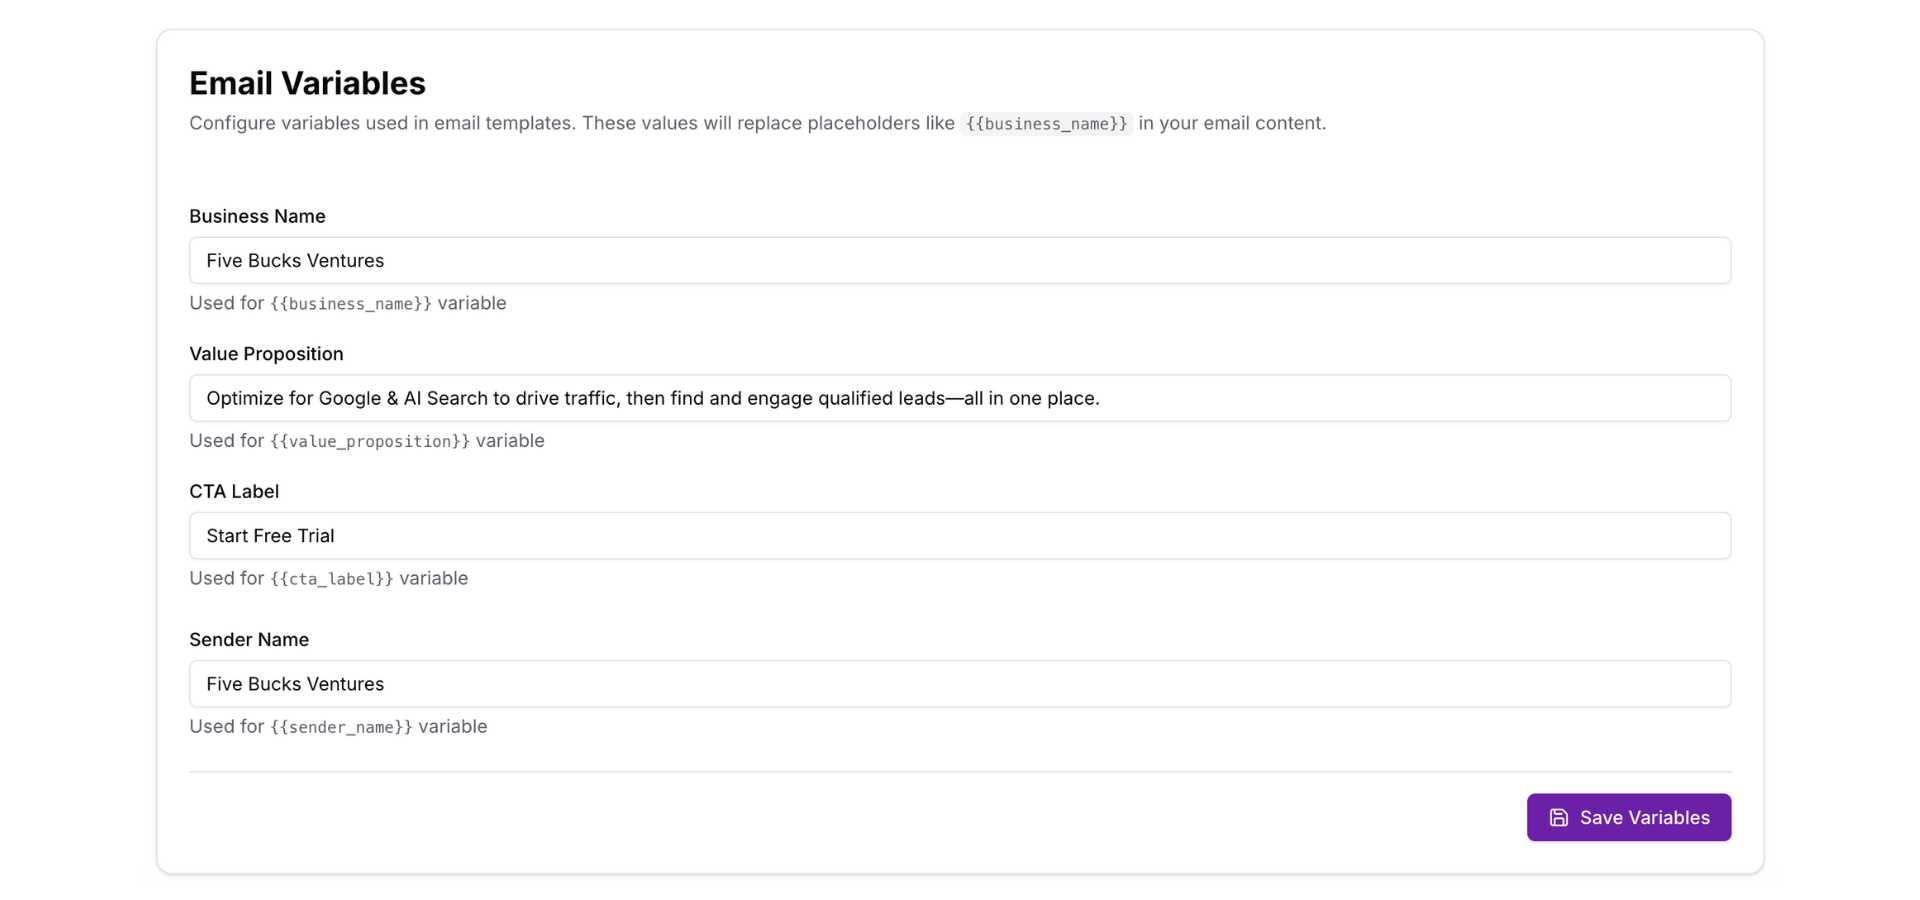
CTA fields:
- Action URL: The destination URL when someone clicks your CTA button
- CTA Label: The button text displayed to users
- Booking URL (Optional): URL for scheduling/calendar if you use booking tools
How CTAs are used:
Primary CTA button in email campaigns
styled with your brand colors
Available as {{cta_label}} variable in email templates
Booking URL used in specific email templates
consultation requests, demo bookings
- Booking URL used in specific email templates (consultation requests, demo bookings)
Loading image...
Pro Tip
Add Value Propositions
Value propositions are the key benefits or selling points of your product/service—used throughout email campaigns to persuade recipients.
Loading image...

To add value propositions:
- Click "Add Value Proposition"
- Enter a concise benefit statement (e.g., "Save 10 hours per week on content creation")
- Click "Add" or press Enter
- Repeat for multiple value propositions
- Drag to reorder by priority (top = primary value prop)
- Click the ✕ to remove any value proposition
- Click "Save Value Props" to apply
Value proposition examples:
- SaaS: "Automate your marketing in minutes, not hours"
- Service: "Get expert SEO strategies tailored to your business"
- Product: "Premium materials, lifetime warranty, free shipping"
How value propositions are used:
Email subject lines
first value prop often used
Email body content as bullet points
- Available as
{{value_proposition}}variable (returns first value prop) - Some templates cycle through multiple value propositions
Pro Tip
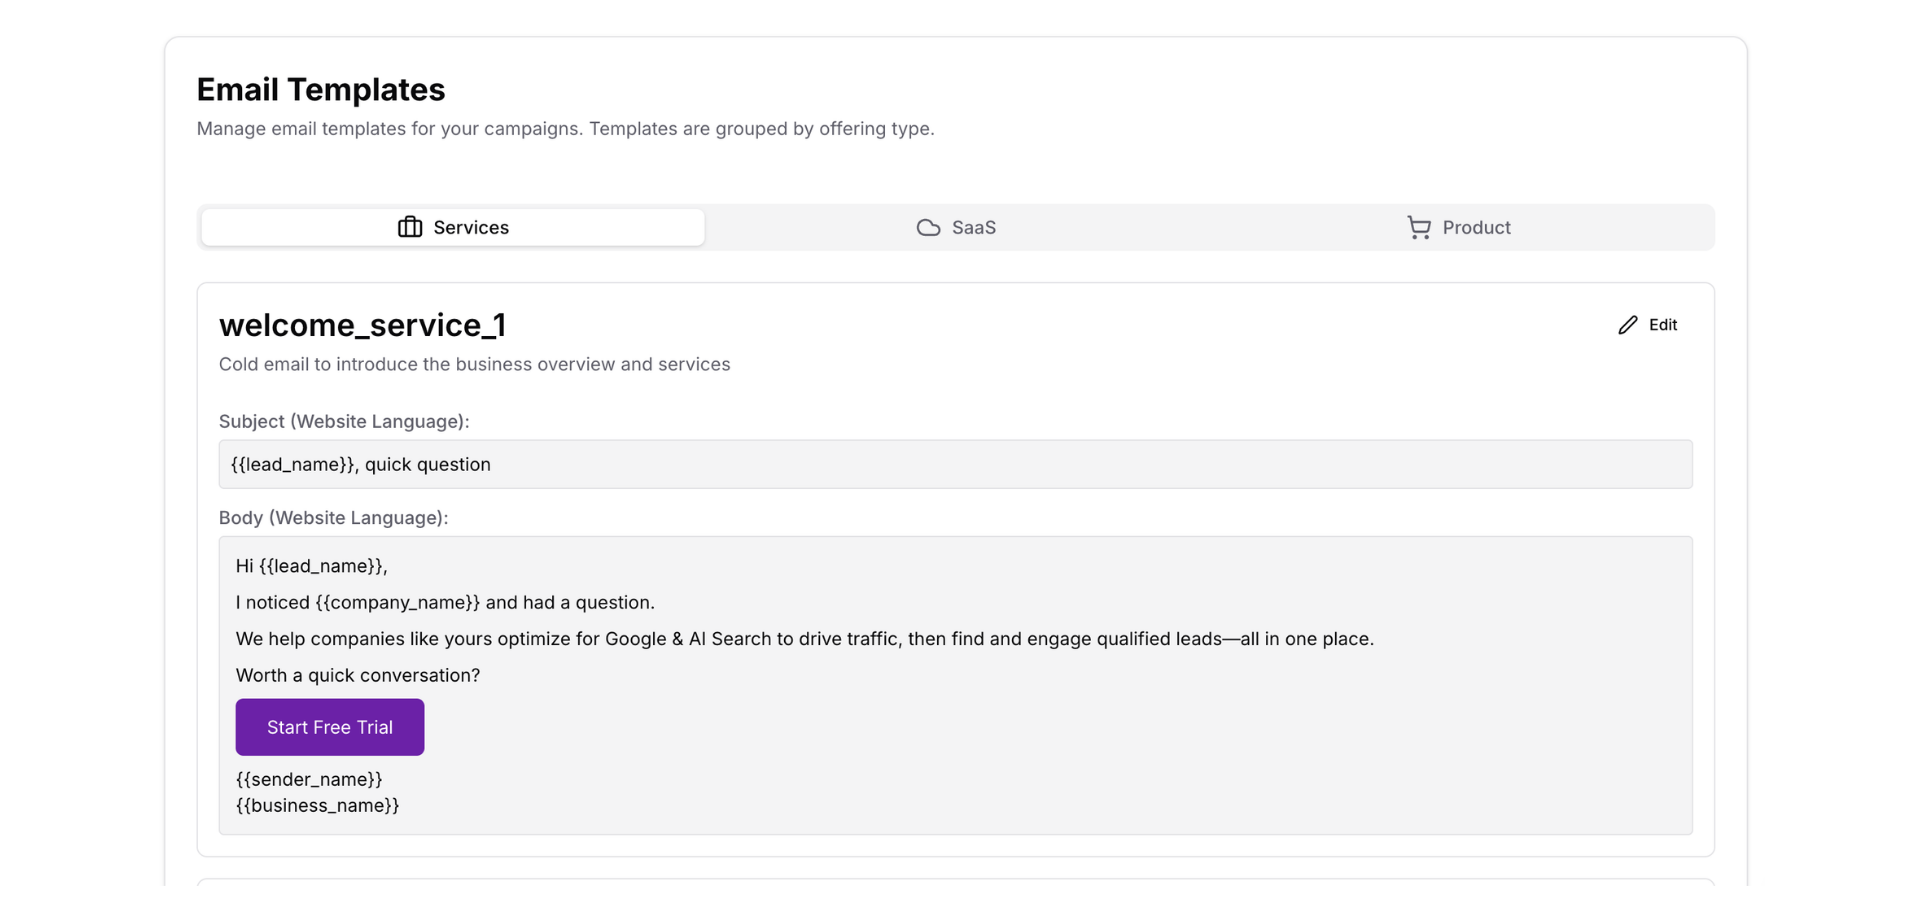
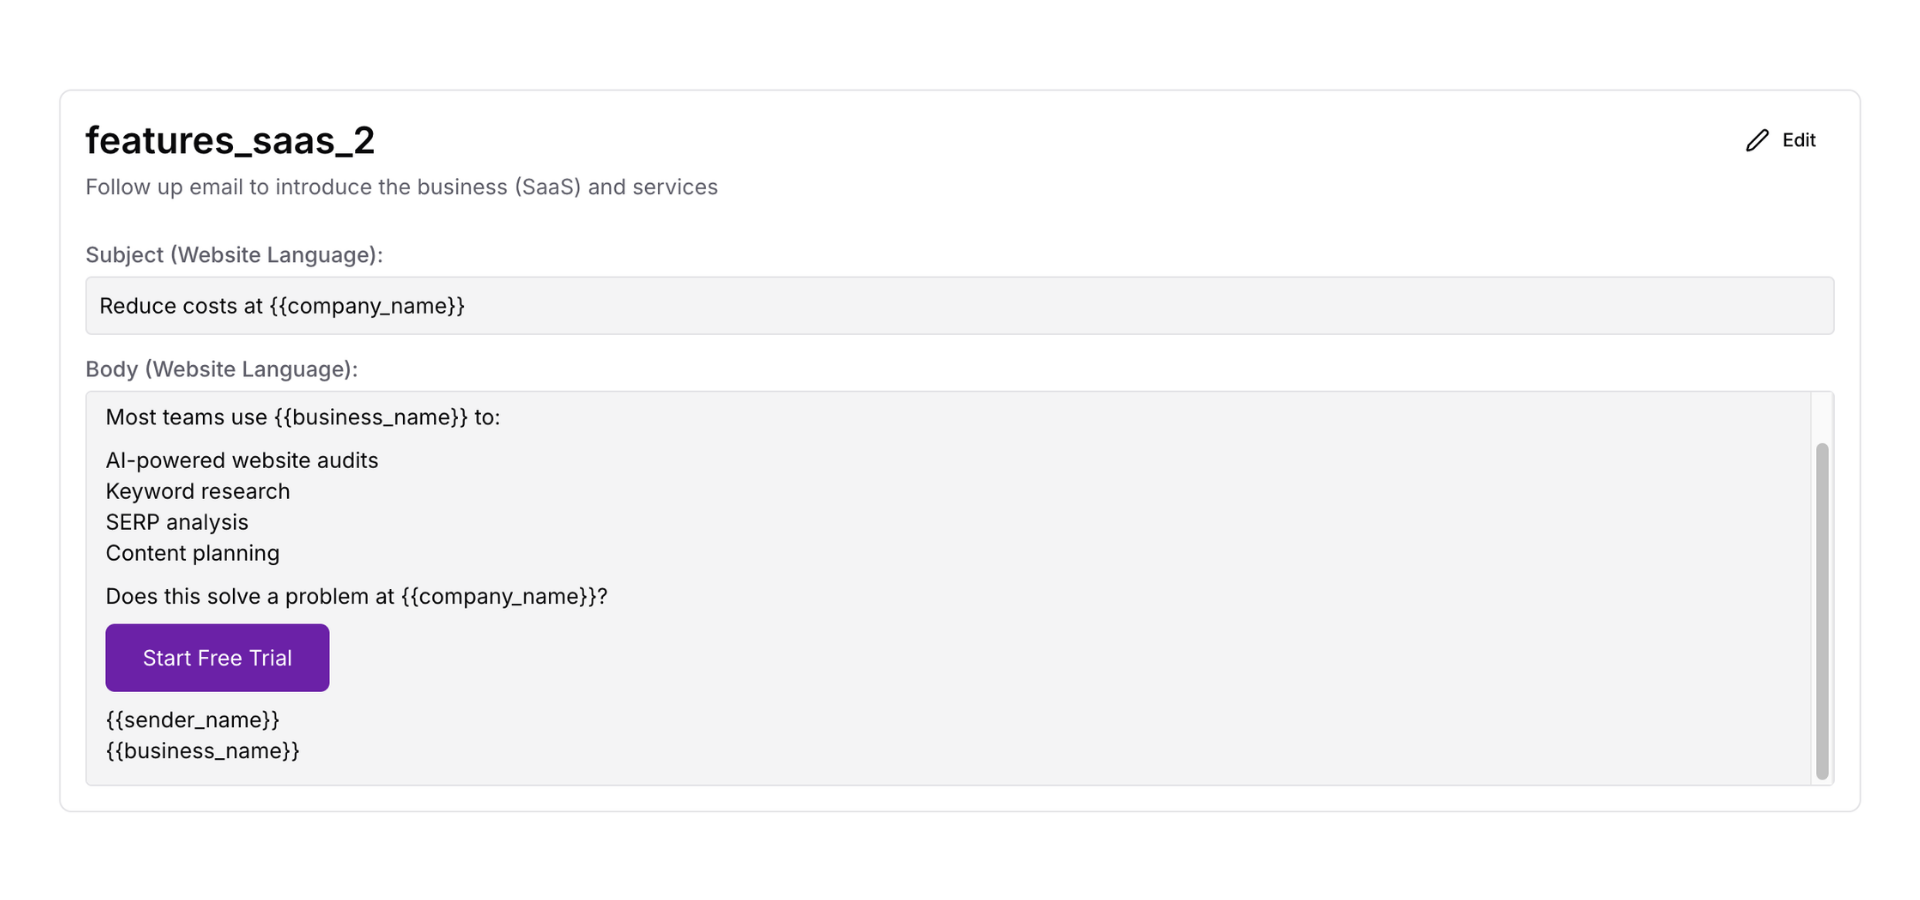
Add Product & Service Bullets (Dynamic)
Depending on your Offering Type (from Step 4), you'll see one of these sections:
For Services (Offering Type: Service)
Loading image...

Services Bullets: List your core services
- Examples: "SEO Optimization", "Content Marketing", "PPC Management", "Social Media Strategy"
For SaaS (Offering Type: SaaS)
Loading image...

Features Bullets: List your key product features
- Examples: "AI-Powered Content Generator", "24/7 Customer Support", "API Access", "Custom Workflows"
For Products (Offering Type: Product)
Loading image...
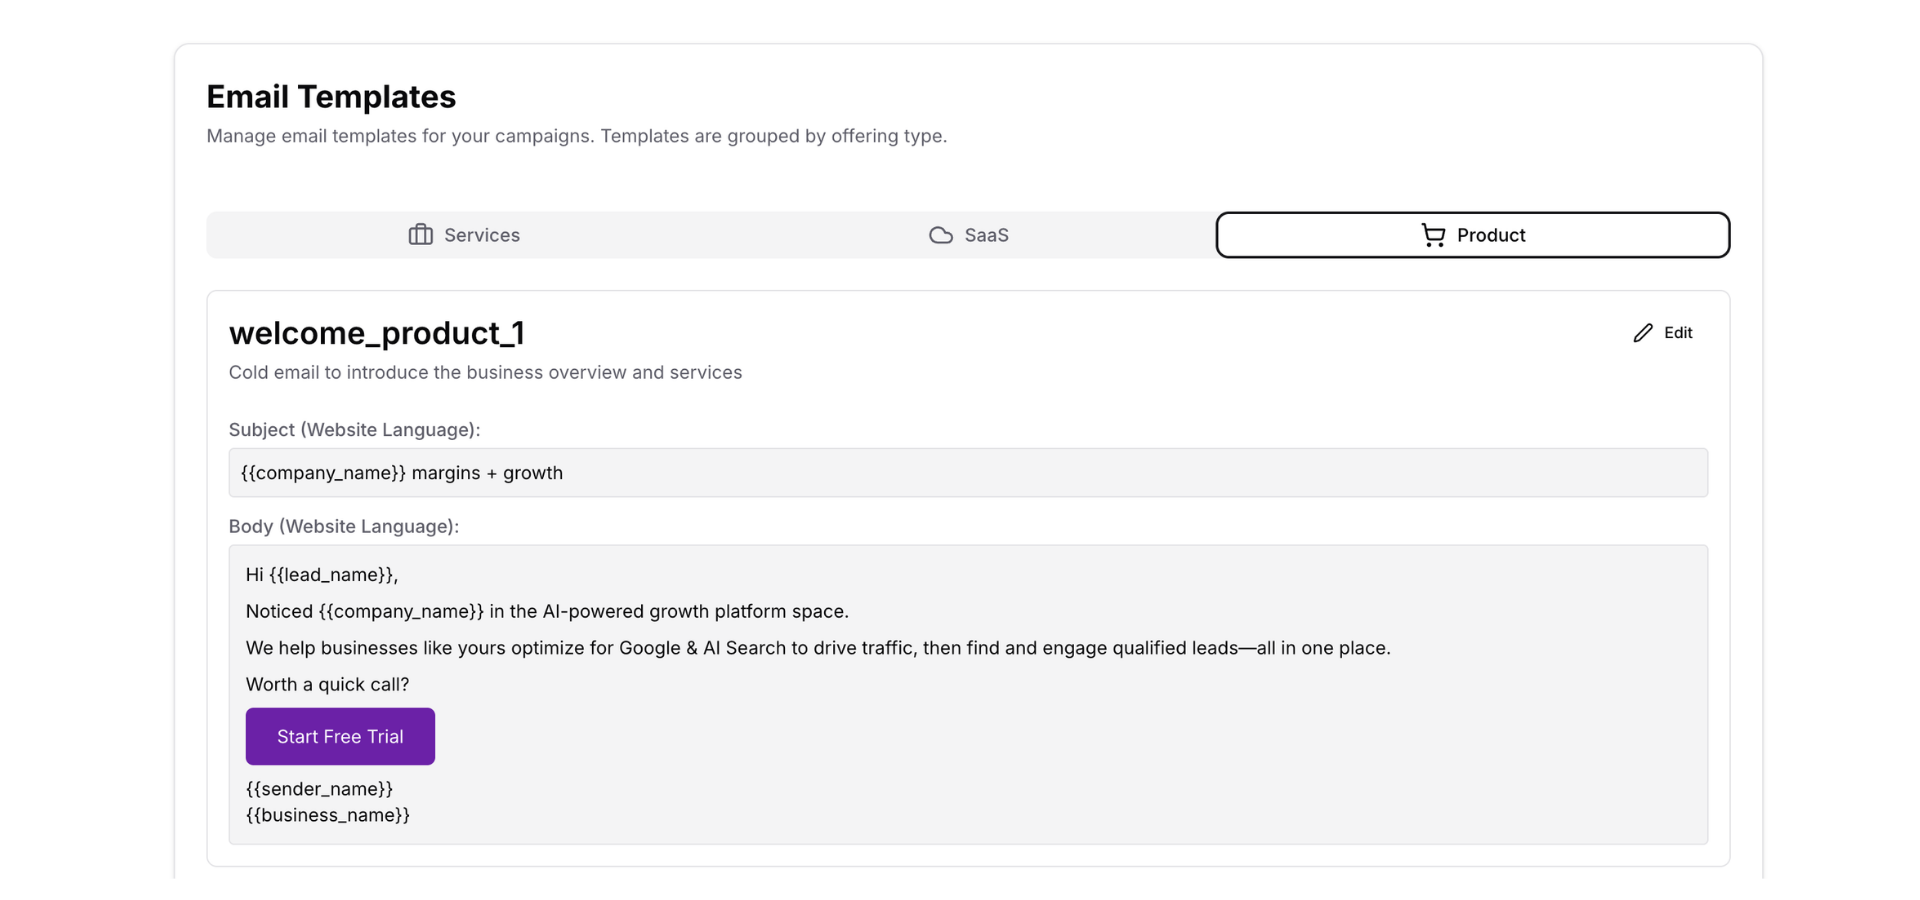
Top Products Bullets: List your best-selling or flagship products
- Examples: "Premium Wireless Headphones", "Smart Home Hub", "Ergonomic Office Chair"
How to add bullets:
- Click "Add Bullet"
- Enter the service/feature/product name
- Add multiple bullets (typically 3-6)
- Reorder as needed
- Click "Save Bullets"
Note
Configure Special Offers (Optional)
Add limited-time offers or promotions to include in email campaigns.
Loading image...
Special offer fields:
- Offer Title: The headline for your offer (e.g., "50% Off First Month")
- Offer Details: Description of the offer (e.g., "Save 50% on your first month when you sign up before March 31")
- Offer Code (Optional): Promo code recipients can use (e.g., "SAVE50")
- Offer Expiry (Optional): Expiration date for urgency (e.g., "2026-03-31")
How offers are used:
Displayed in email campaign templates with prominent styling
Offer code shown as copyable text
Expiry date creates urgency
"Offer expires in 5 days"
Pro Tip
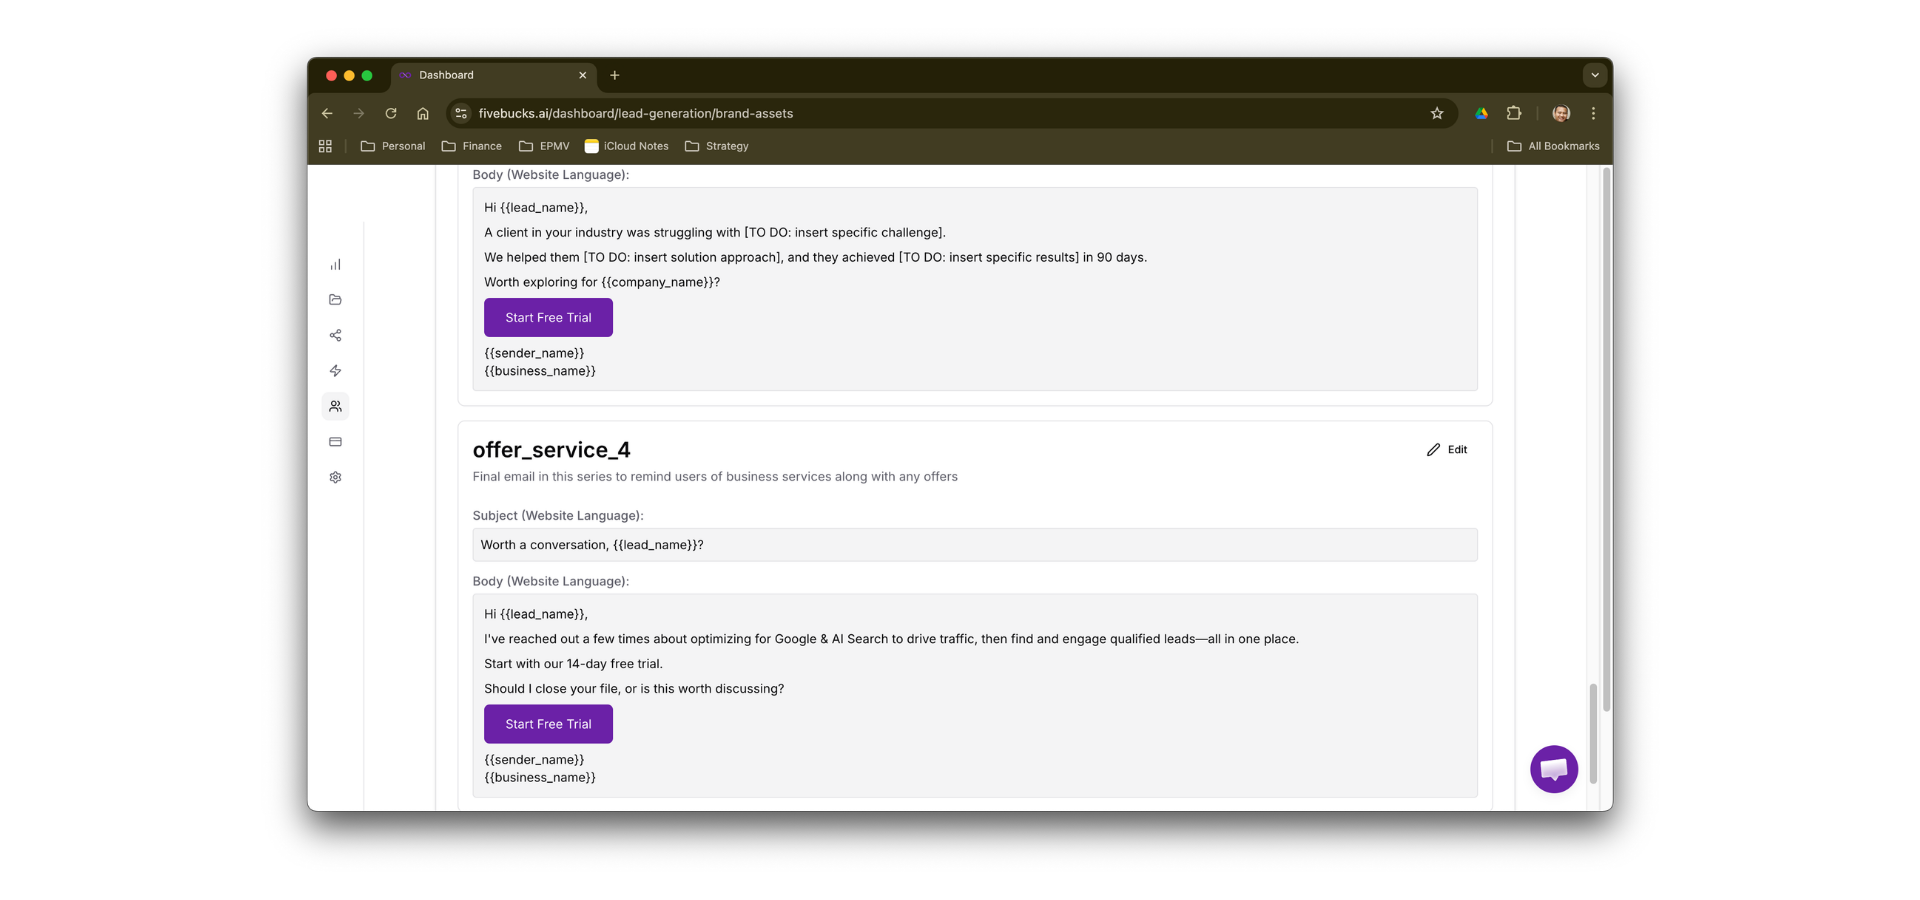
Add Case Studies (Optional)
Case studies provide social proof—showing potential customers how you've helped similar businesses.
Loading image...
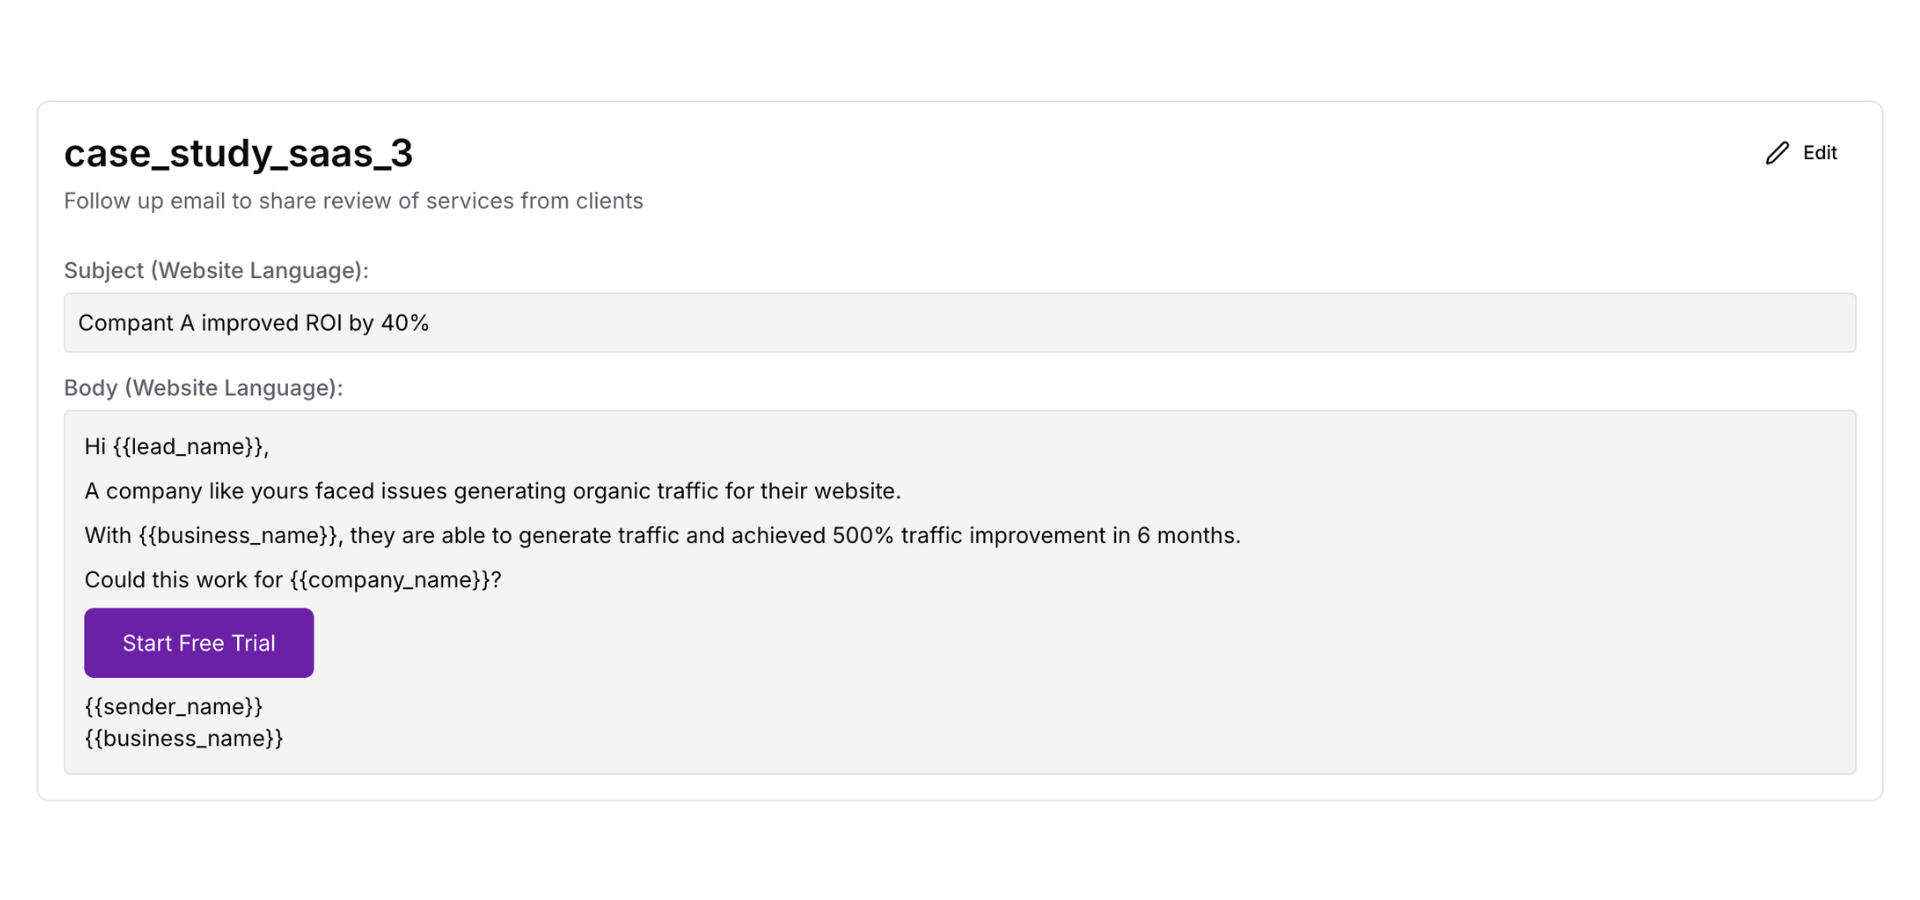
To add case studies:
- Click "Add Case Study"
- Enter case study details:
- Add multiple case studies
- Click "Save Case Studies"
How case studies are used:
- Featured in email campaigns as social proof
- Some templates rotate through multiple case studies
- Results highlighted in bold to draw attention
Pro Tip
Save Your Brand Assets
After configuring all sections:
- Review all sections for accuracy
- Click "Save Changes" at the bottom of the page
- The system updates your
project_brand_assetsrecord - Success message appears: "Brand assets saved successfully"
- Assets are now available for all email campaigns
Note
Preview Brand Assets in Email Templates
See how your brand assets appear in actual email campaigns.
Loading image...
Preview shows:
- Header: Your logo and brand colors applied
- Body: Value propositions, services/features bullets, special offers
- CTA Button: Your CTA label with brand colors
- Footer: Contact information, company address, unsubscribe link
Email template variables:
Your brand assets are available as variables in all email templates:
{{business_name}}→ Your brand name{{value_proposition}}→ First value proposition
{{cta_label}} → Your CTA button text
{{sender_name}} → From your email signature or brand name
Logo URL → Automatically inserted in email HTML
- Brand colors → Applied to buttons, headers, accents
Pro Tip
Troubleshooting
Logo Upload Failing
Problem: "Failed to upload logo" error when clicking Upload
Solutions:
- Check file format - Only JPEG, PNG, WebP, SVG supported (no GIF, BMP, TIFF)
- Check file size - Maximum 5MB. Compress large images:
- Try different format - Convert to PNG if other formats fail
- Check file corruption - Re-export logo from design software
Brand Colors Not Applying to Emails
Problem: Saved brand colors don't appear in email preview or sent emails
Solutions:
- Verify colors are saved - Check that "Save Colors" button was clicked
- Refresh email template preview - Close and reopen preview
- Test with new campaign - Create a fresh email campaign to test
Logo Not Showing in Email Preview
Problem: Logo uploaded successfully but doesn't appear in email template preview
Solutions:
- Wait for processing - Logo URL generation can take 5-10 seconds
- Refresh the preview - Click refresh or reload the page
- Test in sent email - Preview rendering may differ from actual emails
Value Propositions Not Appearing in Emails
Problem: Added value propositions but they don't show in email campaigns
Solutions:
- Verify Save - Ensure "Save Value Props" was clicked
- Check template variables - Not all email templates use
{{value_proposition}} - Inspect sent email - Some templates use value props in subject lines only
Offering Type Changed But Bullets Didn't Update
Problem: Changed offering type from Service to SaaS but still see "Services Bullets"
Solutions:
- Refresh page - Changes may not reflect until page reload
- Re-save bullets - Re-enter bullets in the new section
Special Offer Not Displaying
Problem: Configured special offer but it doesn't appear in email campaigns
Solutions:
- Check email template - Not all templates include special offers section
- Use offer-specific template - Select templates designed for promotions