

Domain Verification
Verify your email domain to send professional emails with improved deliverability from your own domain name.
What is Domain Verification?
Domain verification allows you to authenticate your email domain for sending emails through FiveBucks' email delivery service. Once verified, you can send emails from your domain (like you@yourbusiness.com instead of noreply@fivebucks.ai) with significantly better deliverability and trust.
When you verify a domain, the system:
- Creates DNS records that prove you own the domain
Sets up email authentication
SPF, DKIM, Return-Path
Automatically creates a dedicated email server for your domain
Enables sending from workflows, campaigns, and transactional emails
Before You Begin
- Active FiveBucks project with Lead Generation enabled
- A domain name you own (e.g., "yourbusiness.com")
- Access to your domain's DNS settings
- Login credentials for your DNS provider (Cloudflare, GoDaddy, Namecheap, etc.)
Navigate to Domain Verification
From your dashboard, click Lead Generation in the sidebar, then click Domain Verification in the submenu.
Loading image...
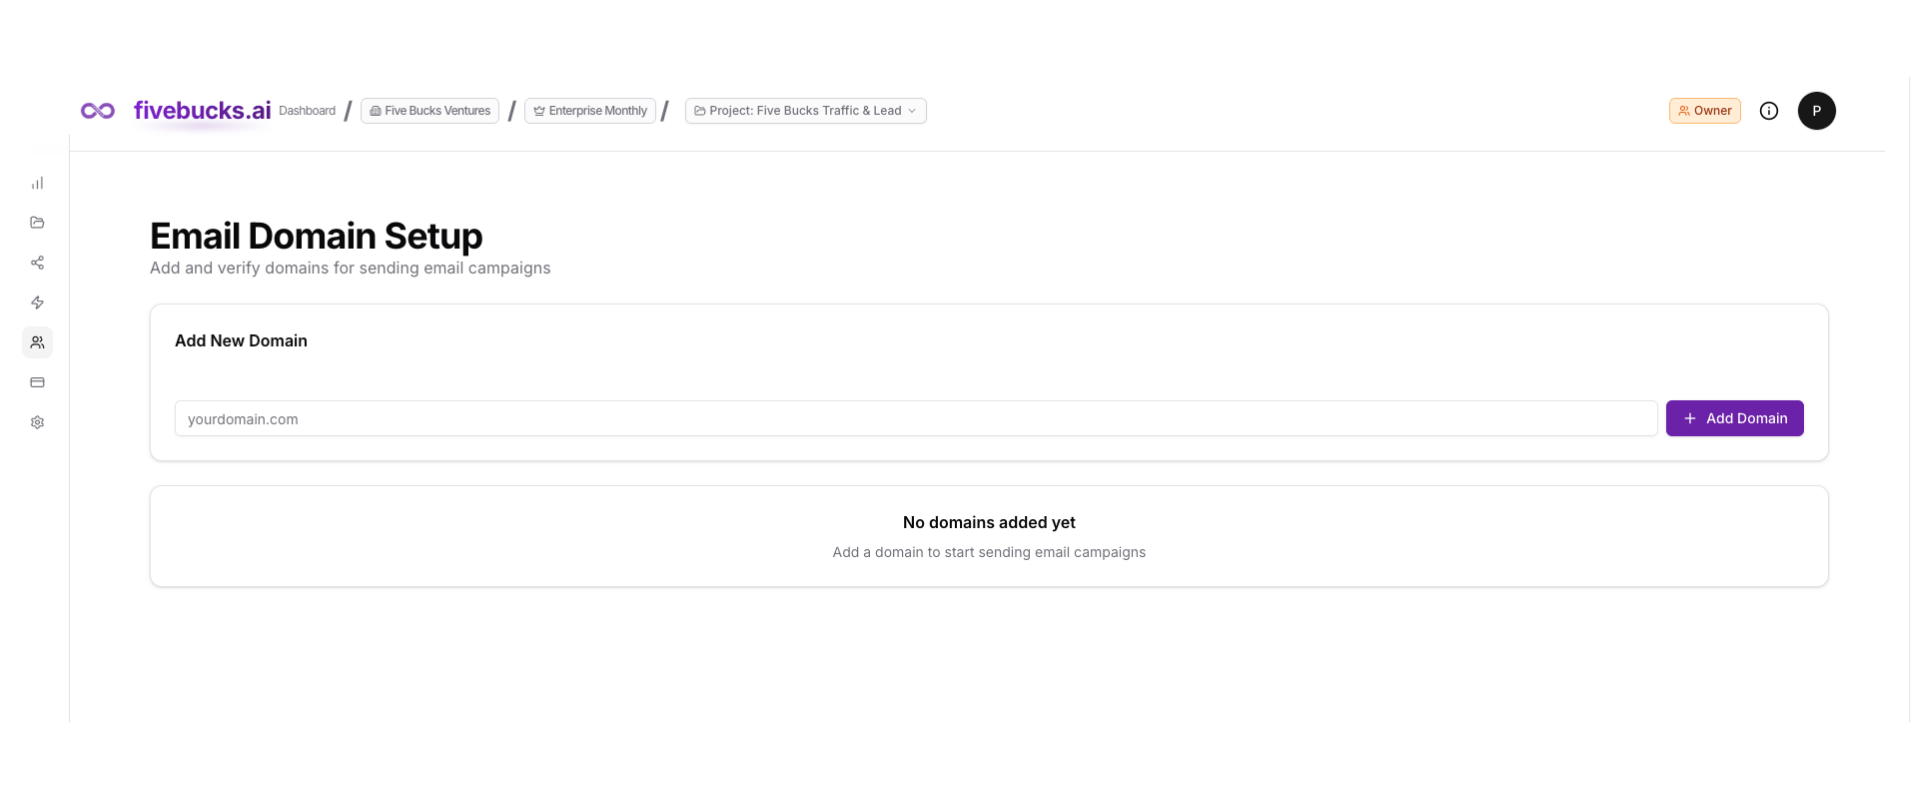
You'll see a list of domains (empty if this is your first time) and an "Add Domain" button.
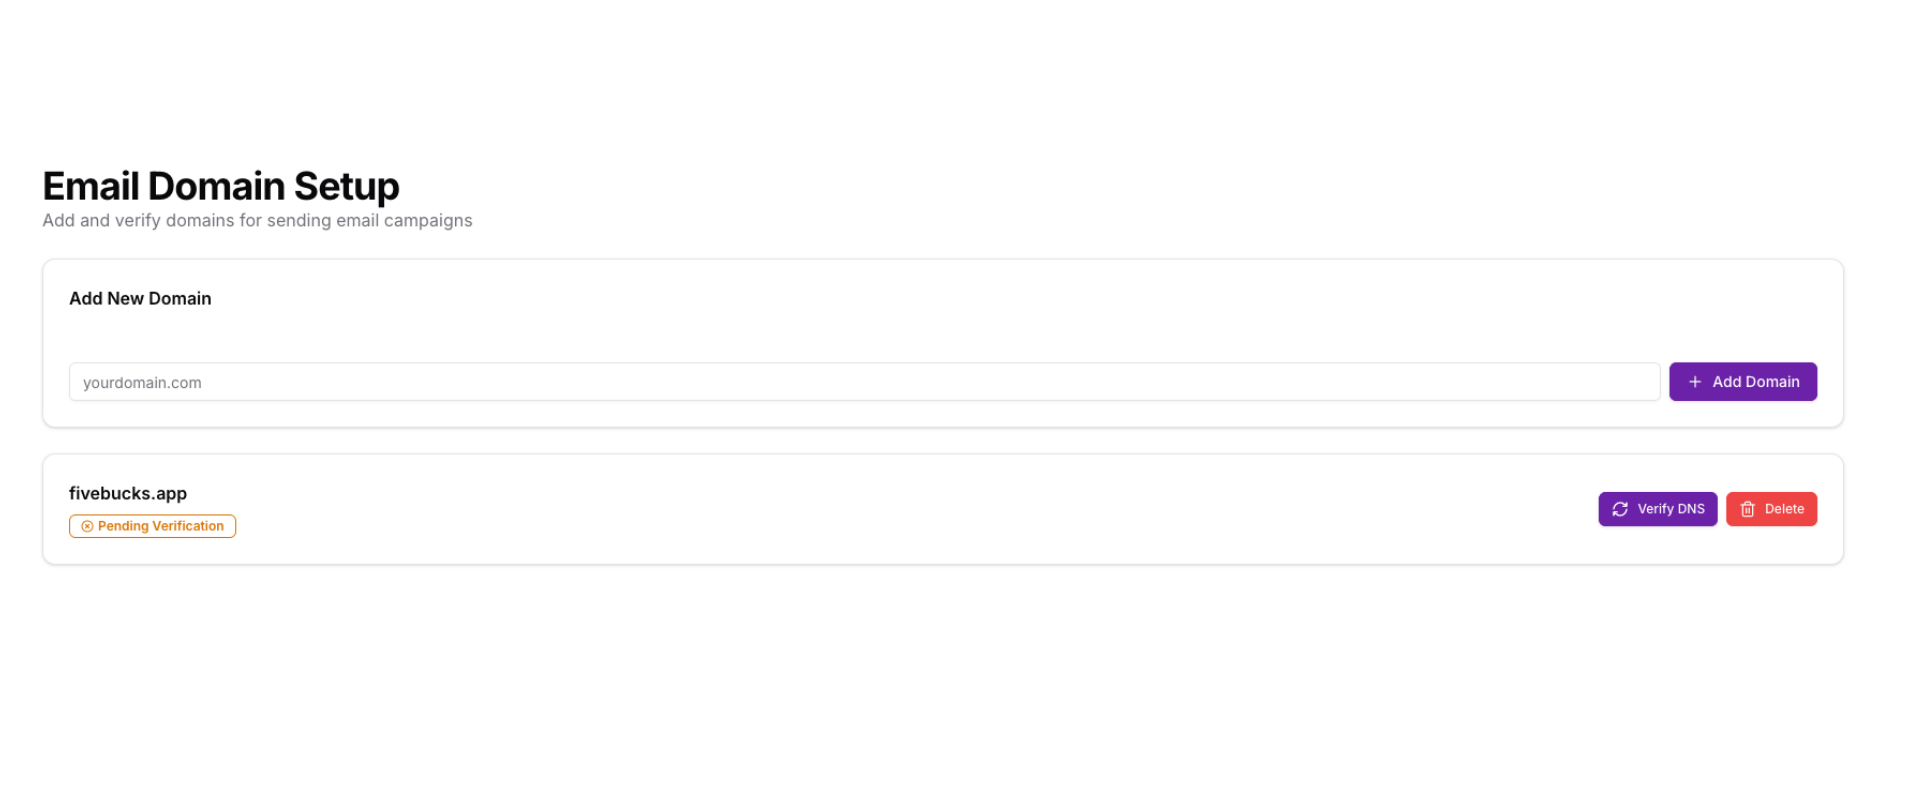
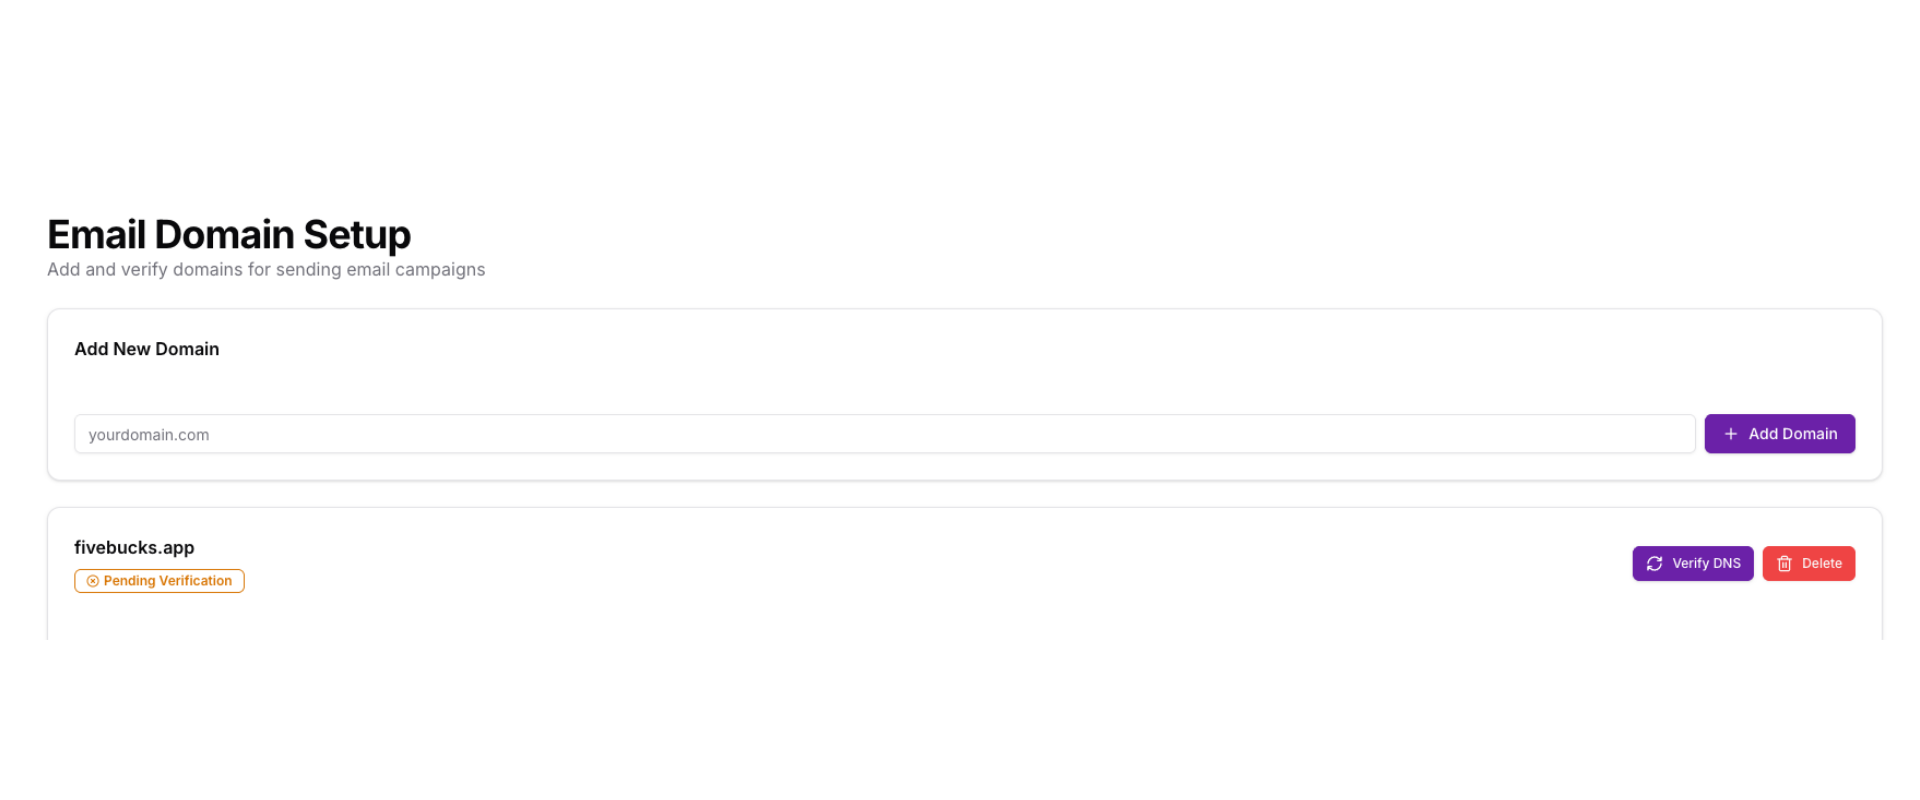
Add Your Domain
Enter your domain name (e.g., "yourbusiness.com") and click "Add Domain". You will see your domain with status “Pending Verification”
Loading image...
Note
After submission, the system:
- Creates the domain in our email delivery service
- Generates three DNS records you'll need to configure
- Displays a domain card with DNS configuration instructions
Loading image...
Pro Tip
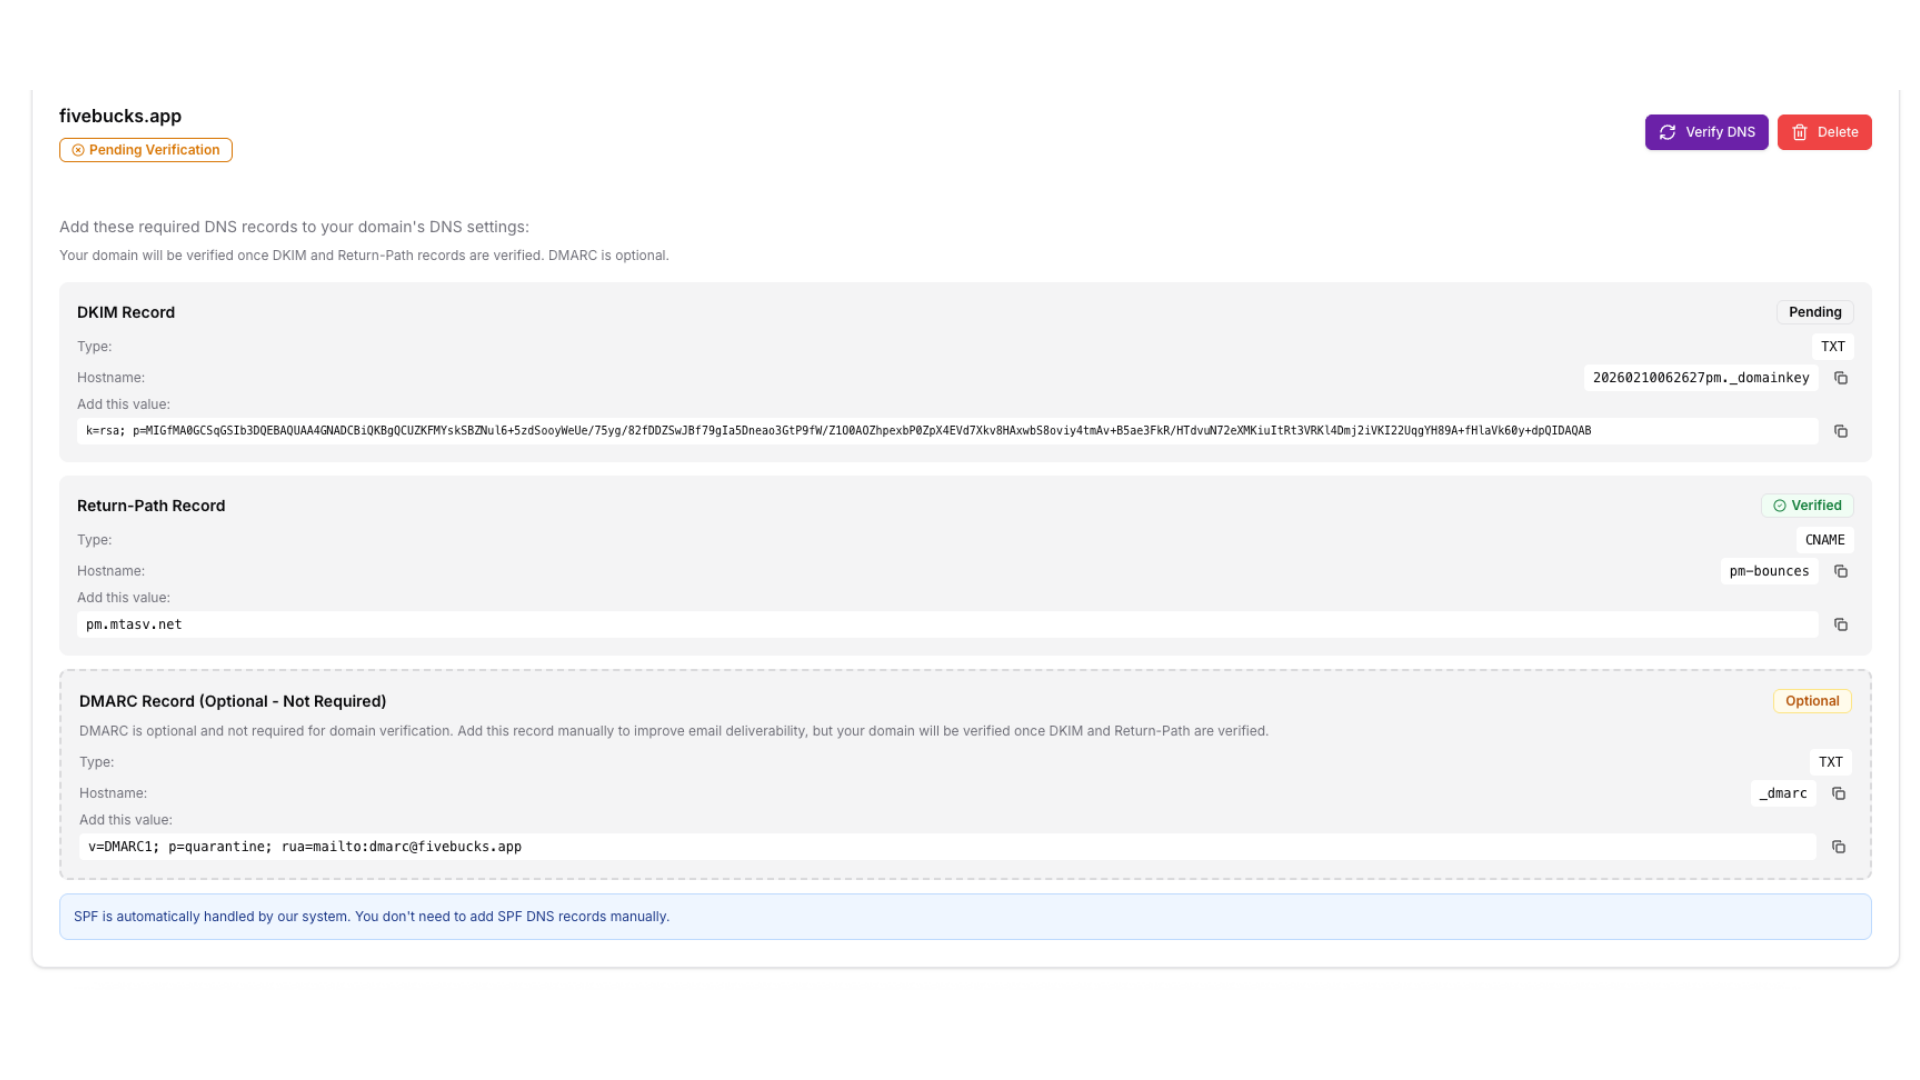
Understanding Your DNS Records
After adding your domain, you'll see three DNS records that need configuration:
Loading image...
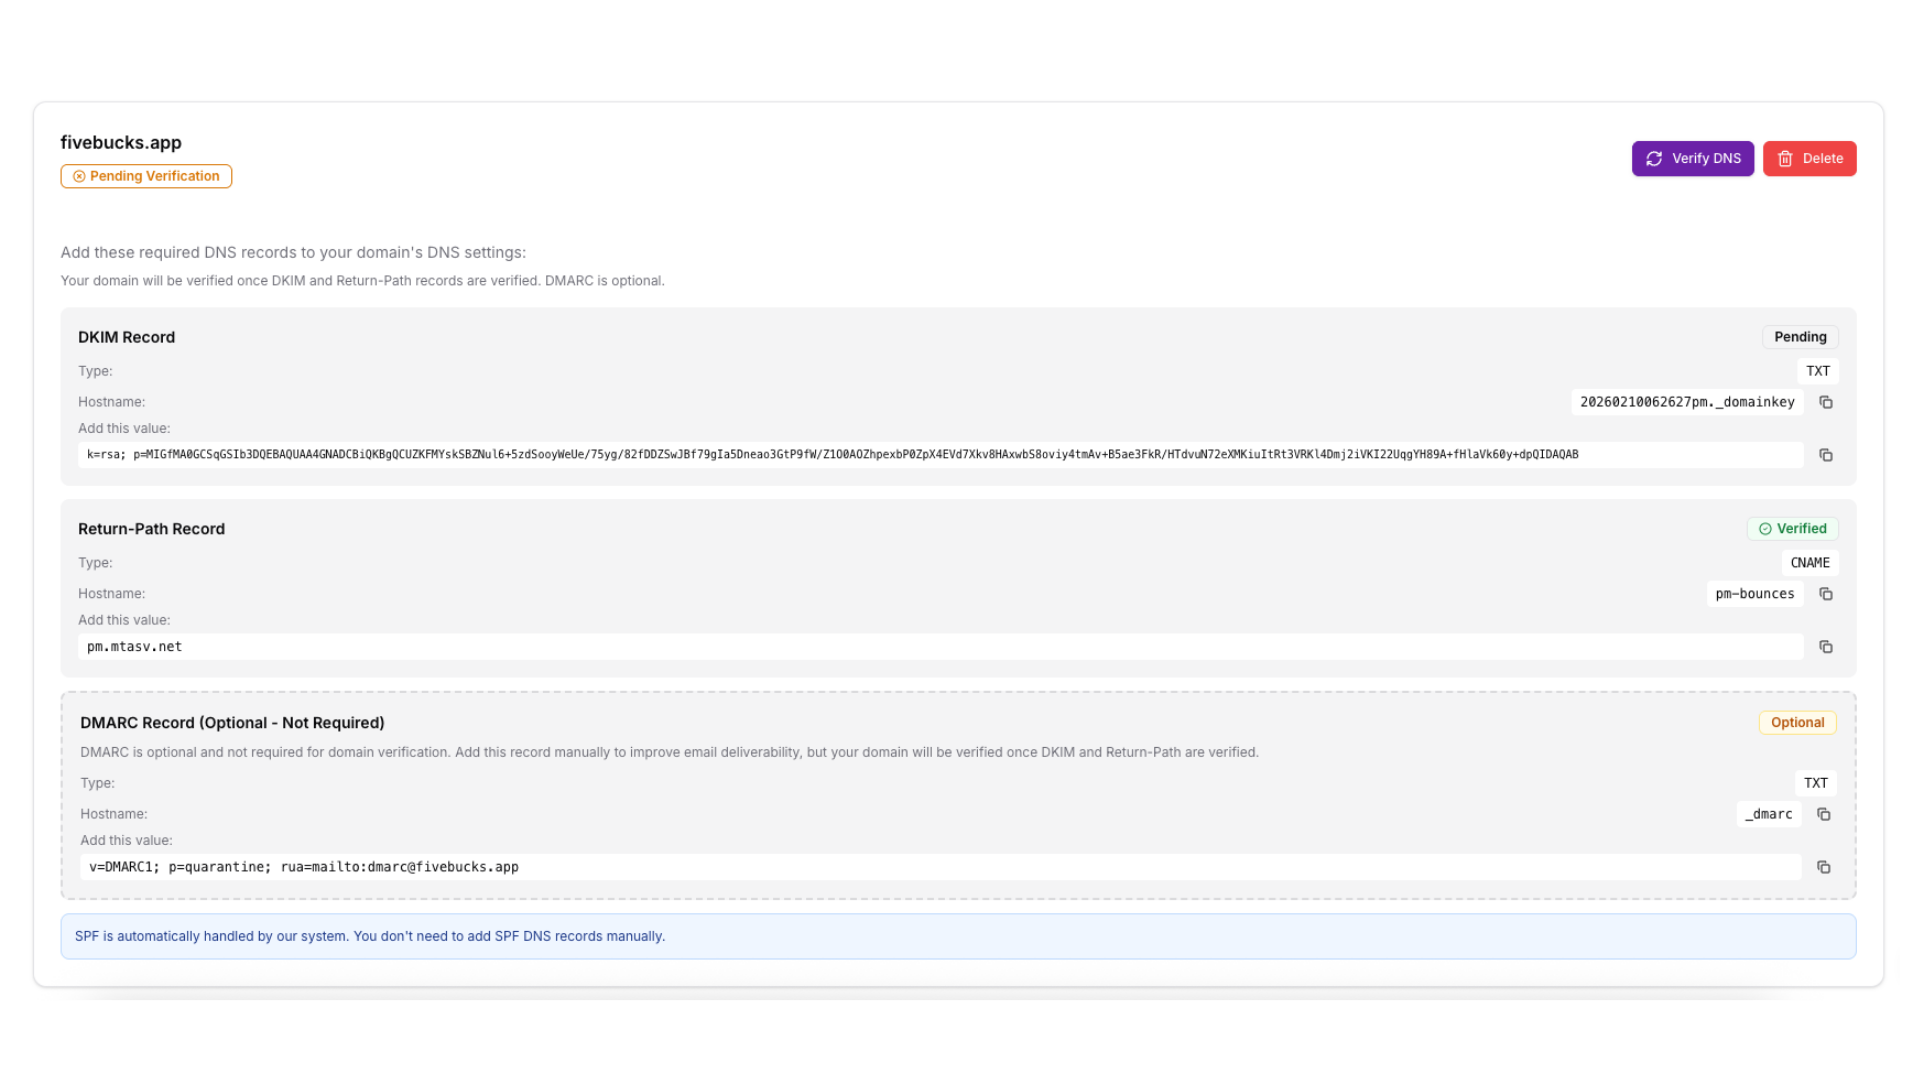
DKIM Record (DomainKeys Identified Mail)
- Type: TXT
- Hostname:
pm._domainkey - Purpose: Cryptographically proves your emails haven't been tampered with in transit
Return-Path Record
- Type: CNAME
- Hostname:
pm-bounces - Purpose: Specifies where bounced emails should be sent and validates sending authorization
DMARC Record (Optional)
- Type: TXT
- Hostname:
_dmarc - Purpose: Tells receiving mail servers what to do if SPF or DKIM authentication fails
Note
Configure DNS Records at Your Provider
Now log in to your DNS provider (where you registered your domain) and add the three DNS records.
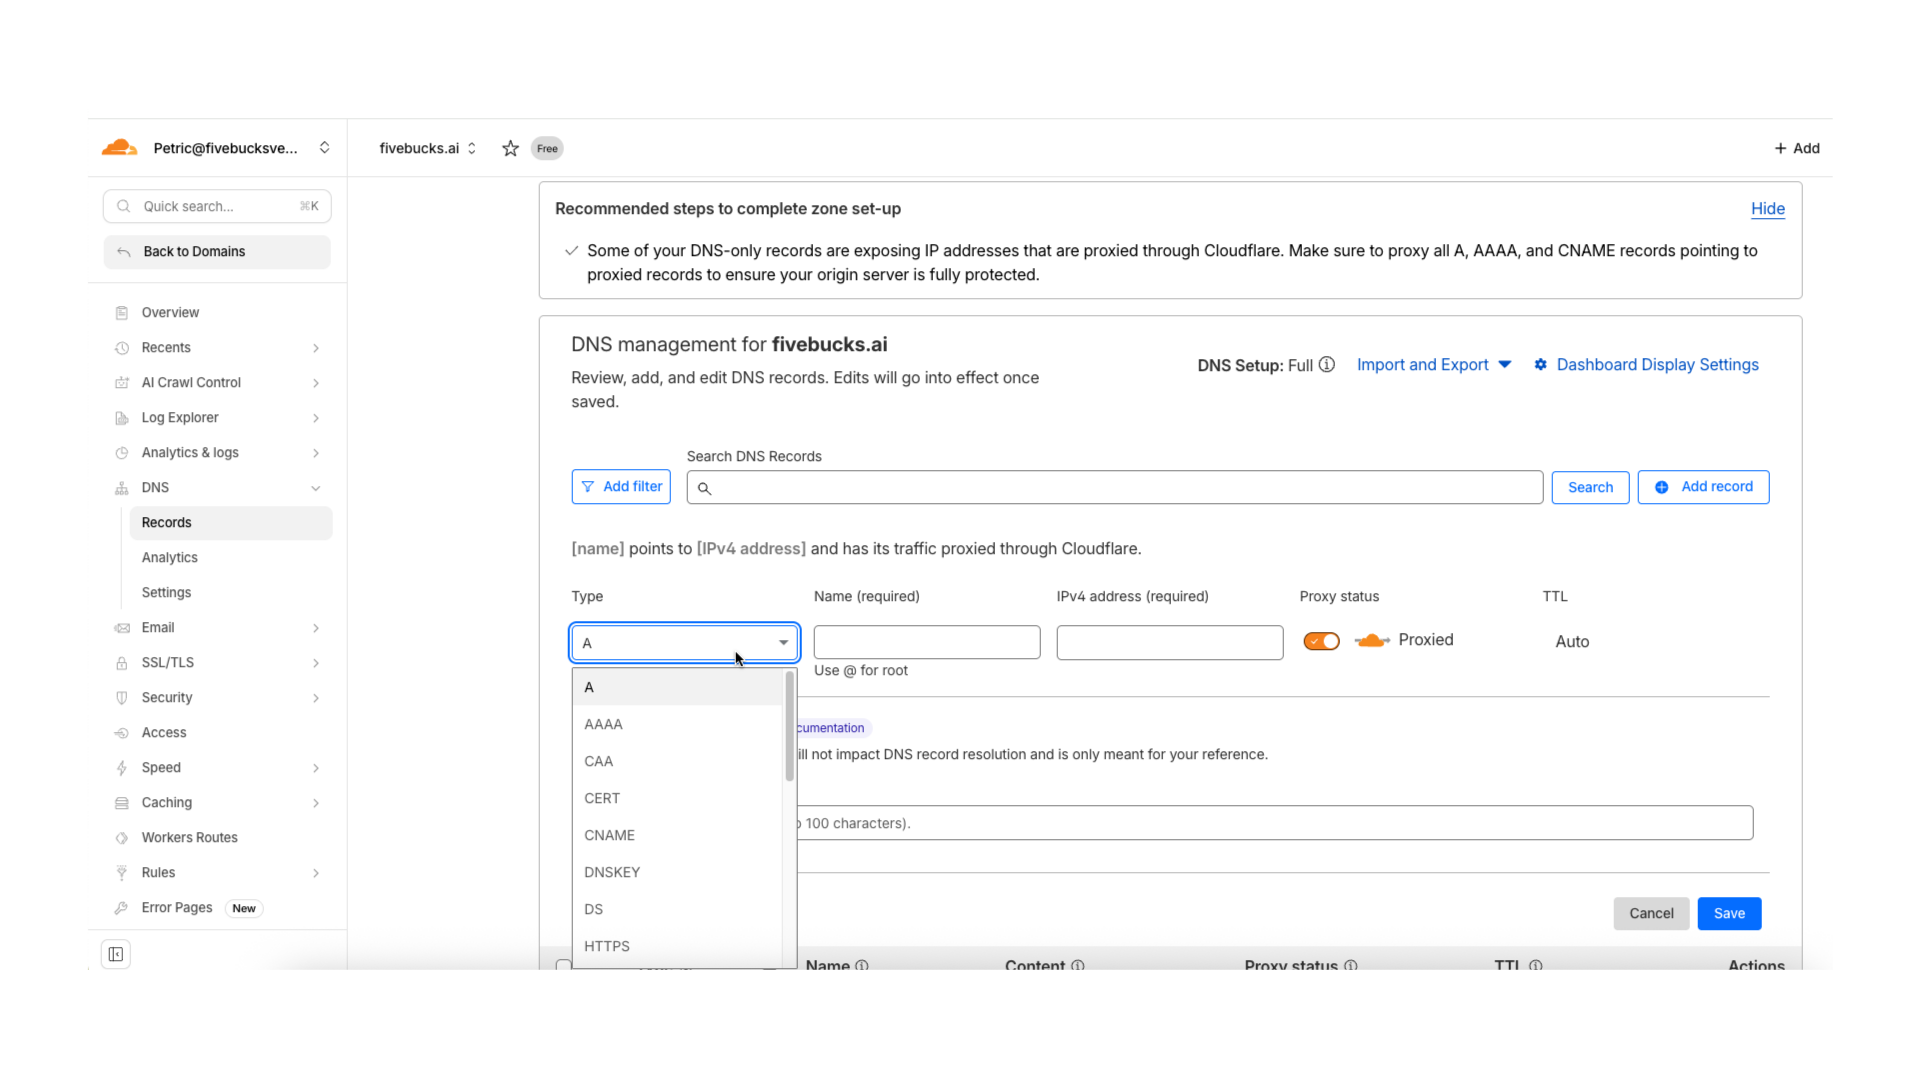
For Cloudflare Users:
- Log in to your Cloudflare dashboard
- Select your domain from the list
- Navigate to DNS → Records
- Click "Add record"
- For the DKIM record:
- Repeat for the Return-Path CNAME record
Loading image...
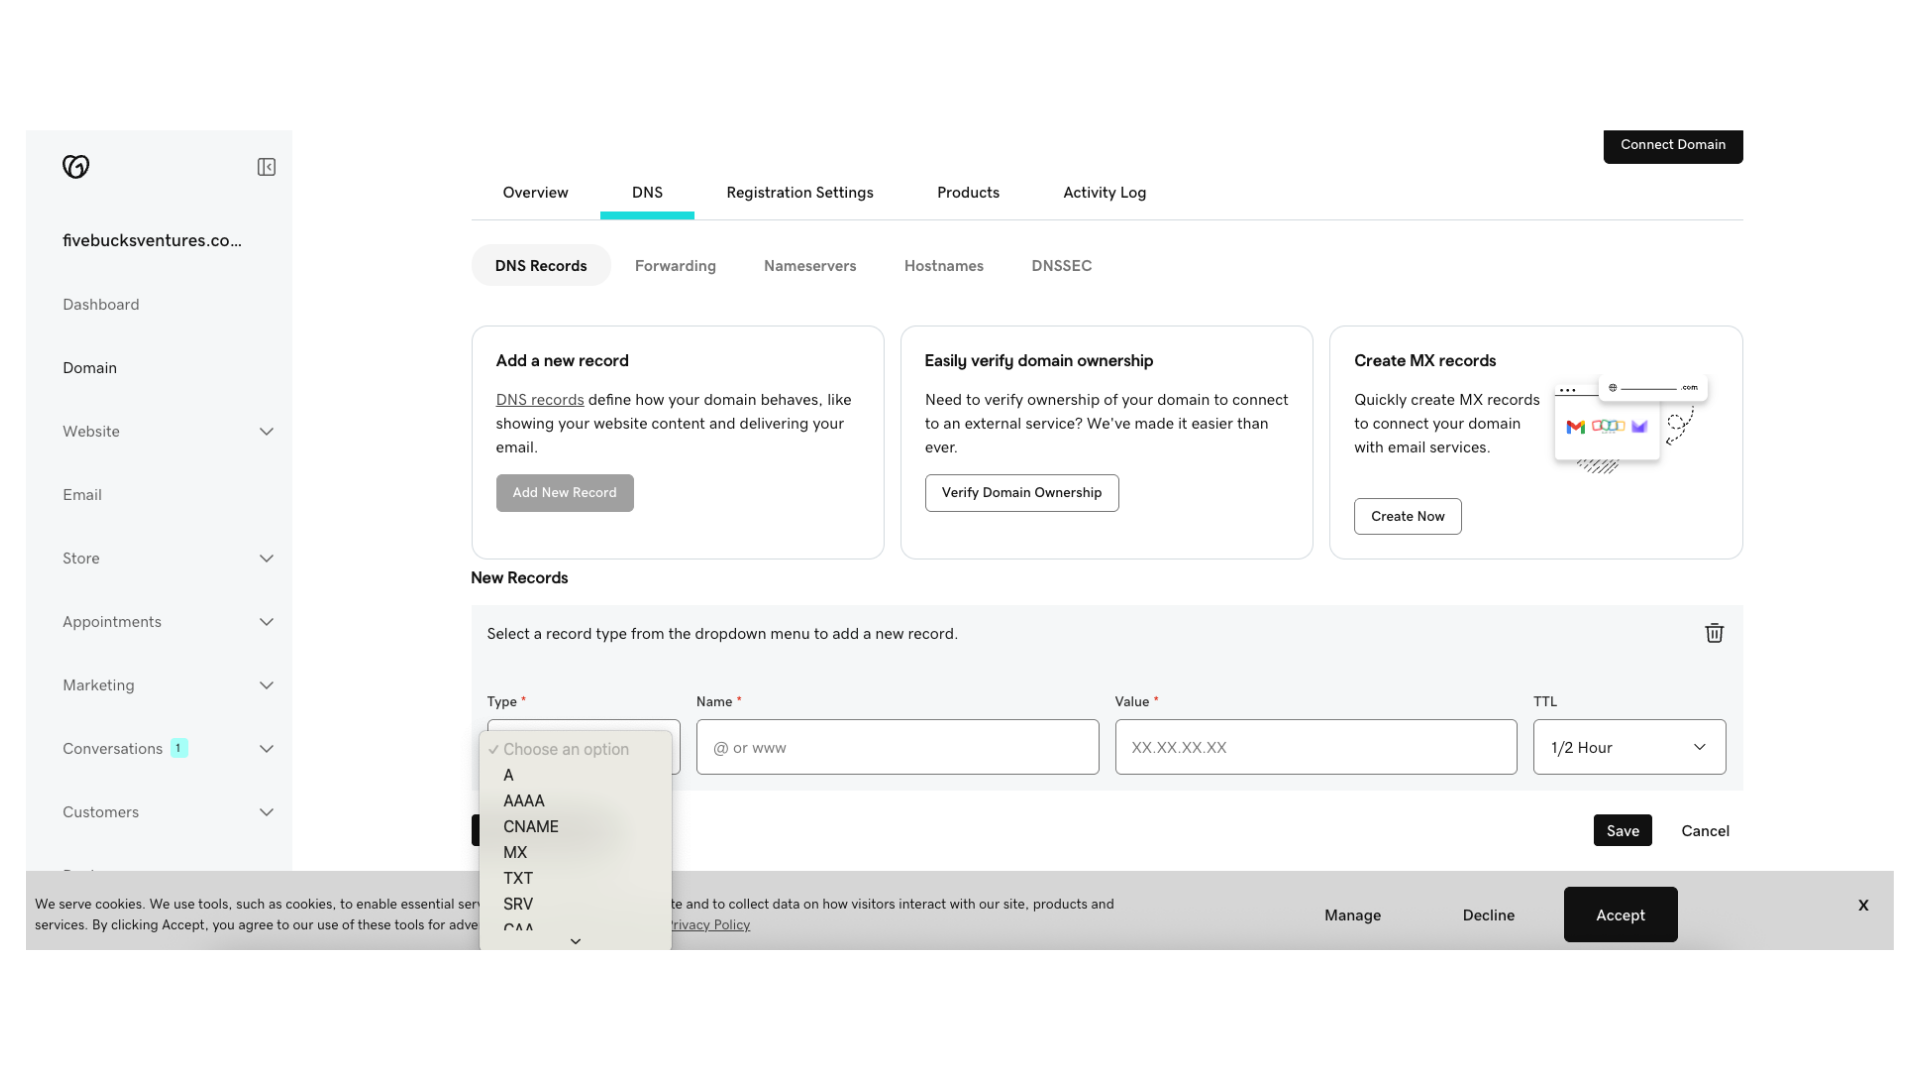
For GoDaddy Users:
- Log in to your GoDaddy account
- Go to My Products → Domains
- Click DNS next to your domain
- Scroll to Records section
- Click Add to create each record
- Select record type (TXT or CNAME) and paste the values
Loading image...
For Other DNS Providers:
The process is similar for Namecheap, Route53, Google Domains, and other providers:
- Find your DNS management page
- Add a new TXT record for DKIM
- Add a new CNAME record for Return-Path
- Add a new TXT record for DMARC (optional)
Pro Tip
Wait for DNS Propagation
After adding DNS records, you need to wait for DNS propagation—the time it takes for DNS changes to spread across the internet.
Typical propagation times:
- 5-15 minutes: Most DNS providers (Cloudflare, Route53)
- 30-60 minutes: Some providers (GoDaddy, Namecheap)
- Up to 48 hours: Maximum theoretical propagation time
While waiting, you can use online DNS checkers to verify your records are propagating:
- MXToolbox.com - DKIM lookup
- DNSChecker.org - Global DNS propagation checker
Note
Verify Your Domain
Loading image...
The system will:
- Query DNS servers for your DKIM and Return-Path records
- Check if they match the expected values
- Update verification status for each record
- Create an email server if all required records are verified
Verification Success
If verification succeeds, you'll see green checkmarks:
Loading image...
- ✅ SPF Verified: Automatically verified
- ✅ DKIM Verified: Your DKIM TXT record is correct
- ✅ Return-Path Verified: Your Return-Path CNAME record is correct
- ⚠️ DMARC: Optional - not verified by the system
Verification Failed
If verification fails, you'll see which records are still pending:
Common reasons for failure:
- DNS hasn't propagated yet (wait longer and retry)
- DNS record value was copied incorrectly (check for typos)
- DNS provider added extra characters (some providers modify records)
Pro Tip
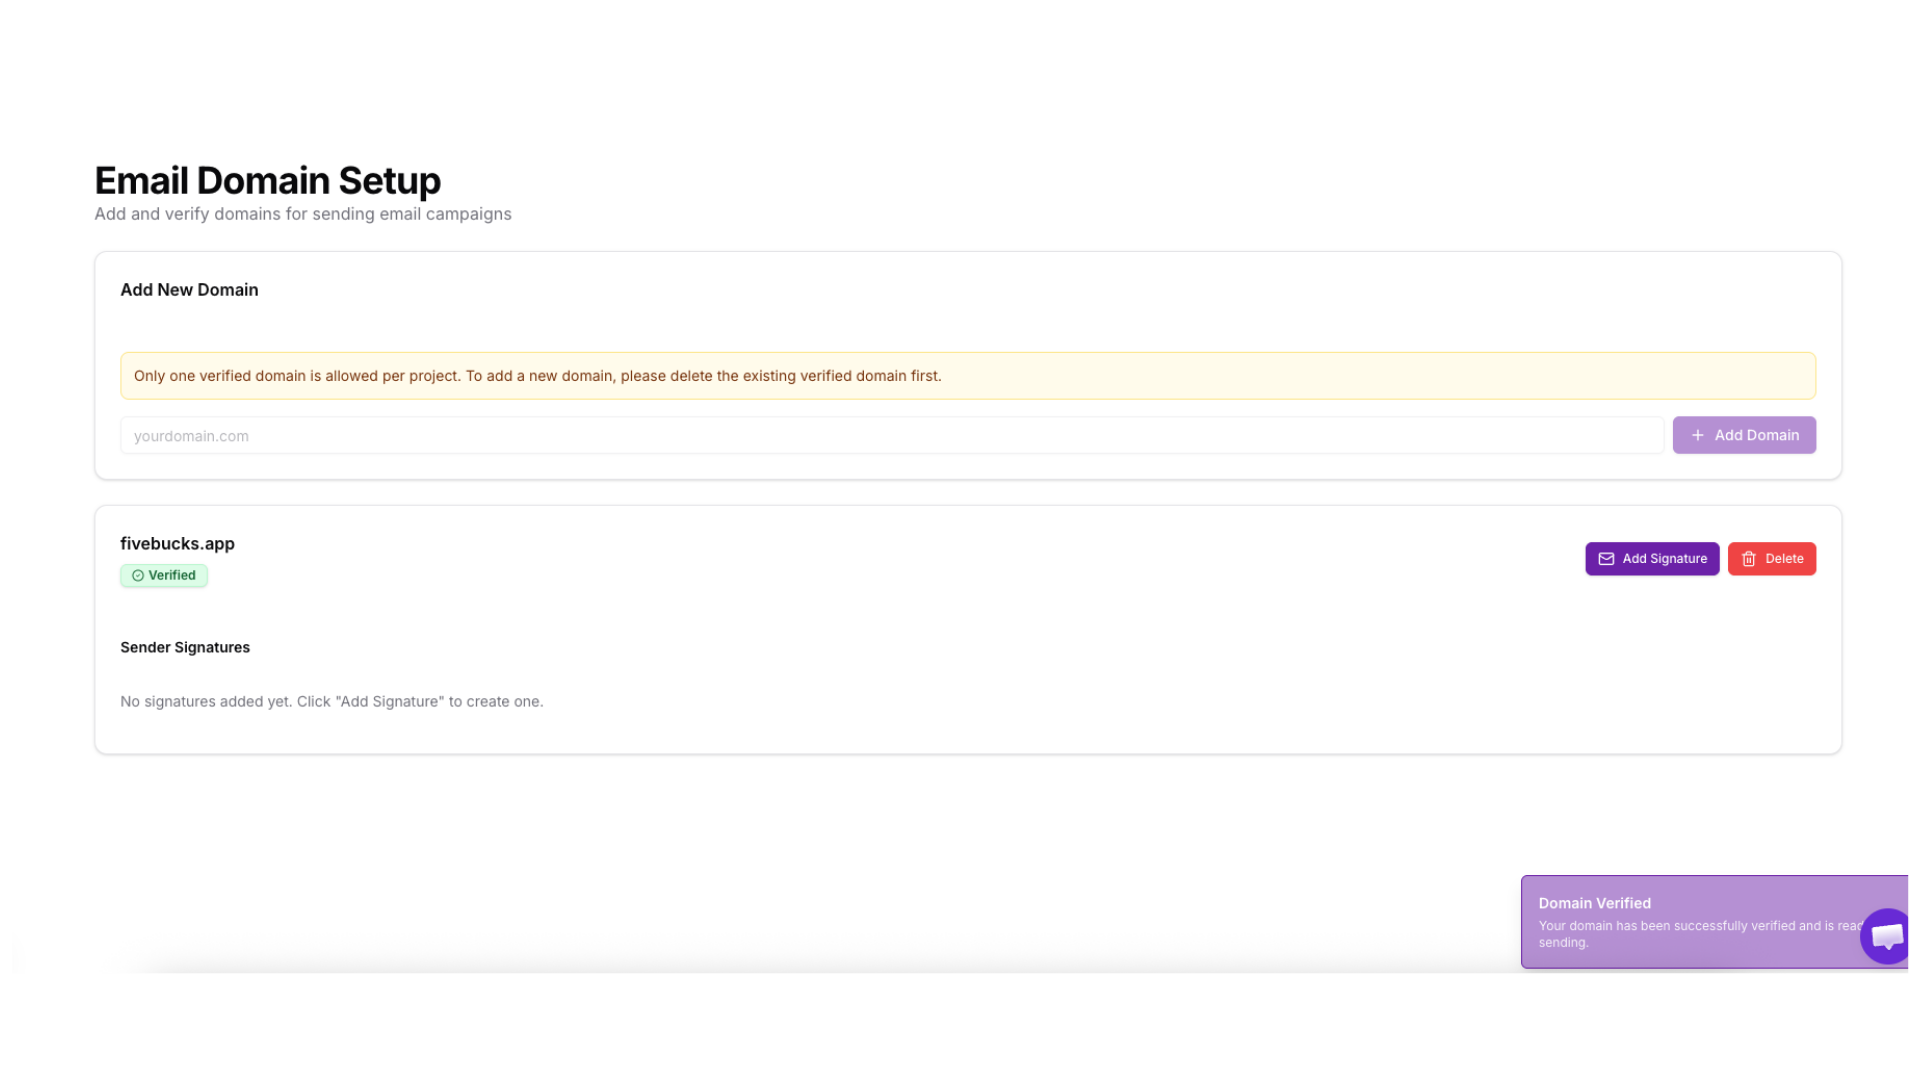
Domain Ready To Send Emails
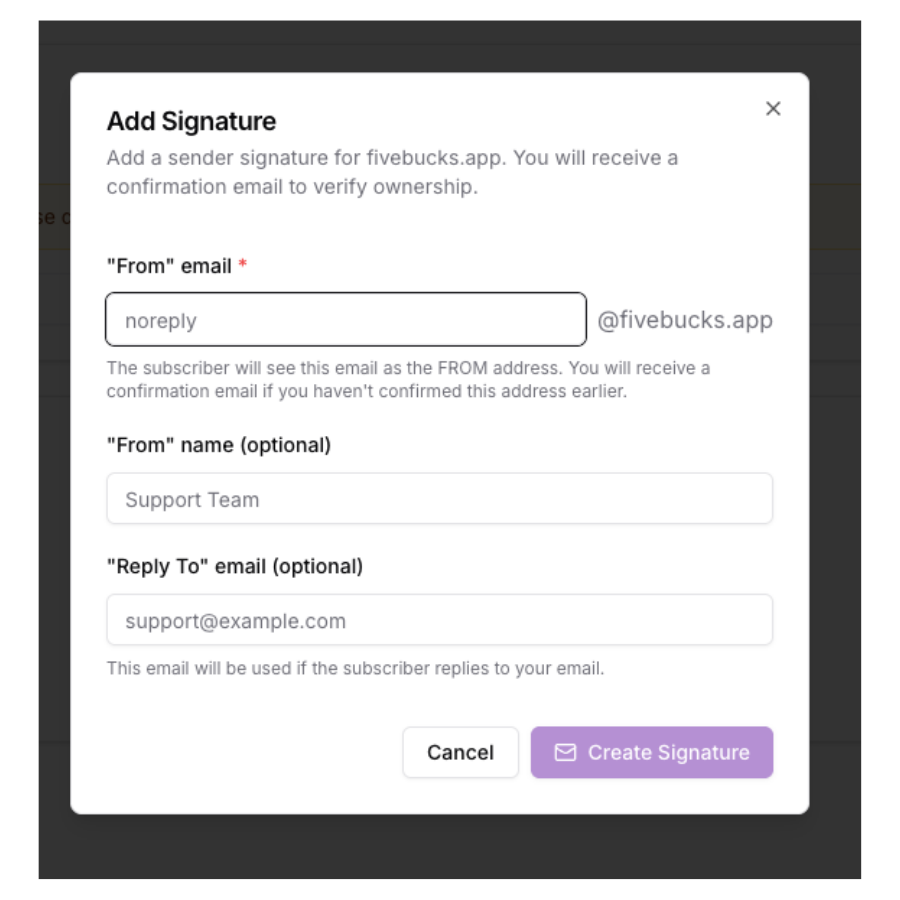
Adding Sender Signature
Once your domain is verified successfully, you will be able to add Sender Signature(s) to attach to your domain. Sender signature is a verified "From" email address or domain authorized to send emails through the platform. It serves as a security measure to prevent spam and abuse, requiring verification (via a confirmation email) to prove ownership of the mailbox.
Loading image...
Once you added you sender signature, your domain is now ready to send emails through:
Workflows: Automated email sequences
Email Campaigns: Broadcast emails to lead lists
Transactional Emails: Account notifications, password resets, etc.
Note
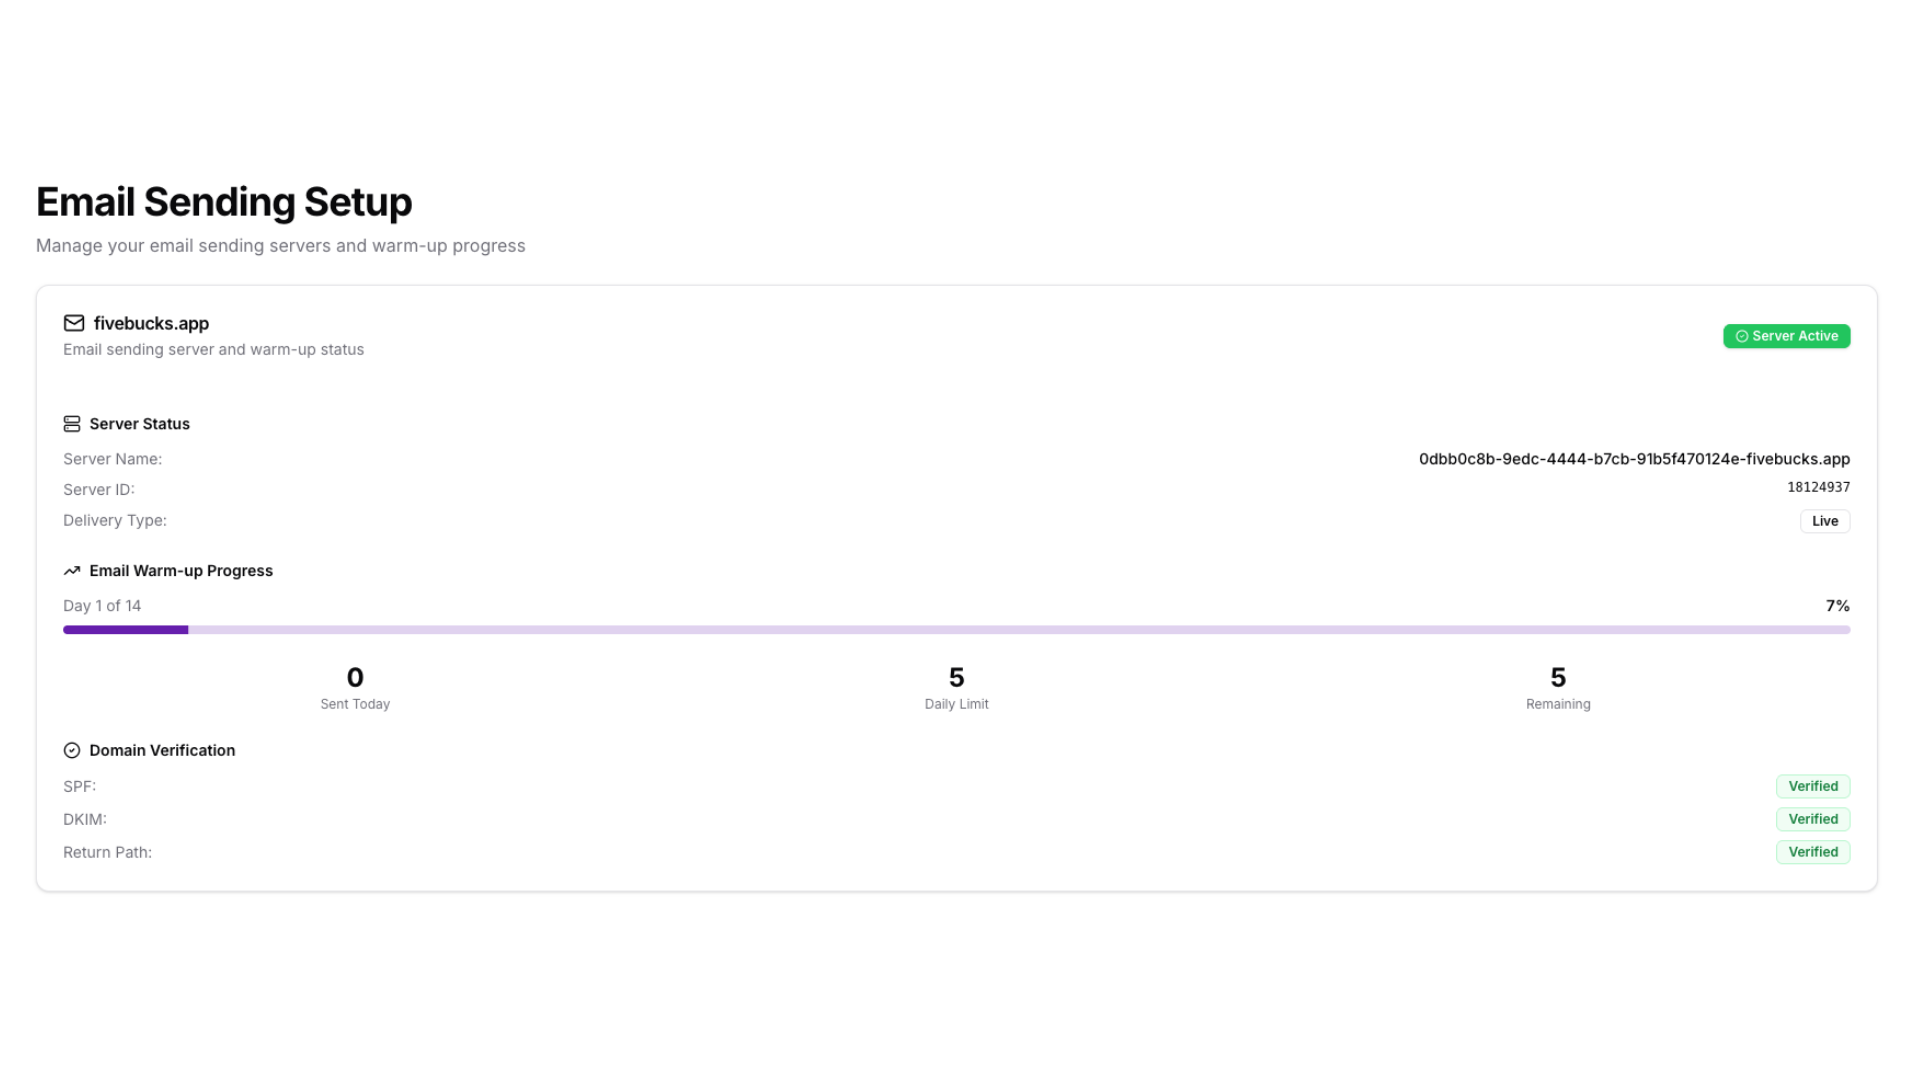
Understanding Domain Warmup
What is domain warmup?
New email domains have no sending history, which makes inbox providers (Gmail, Outlook) suspicious. Warmup gradually builds trust by slowly increasing sending volume over time.
FiveBucks warmup schedule:
Week 1: 50 emails/day
Week 2: 100
200 emails/day
Week 3: 500
1,000 emails/day
Week 4+: Full production limits
10,000+ emails/day
During warmup:
Send emails to engaged recipients who are likely to open/click
Avoid sending to old/unverified email lists
- Monitor bounce rates (keep below 5%)
- Watch spam complaints (keep below 0.1%)
Loading image...
Pro Tip
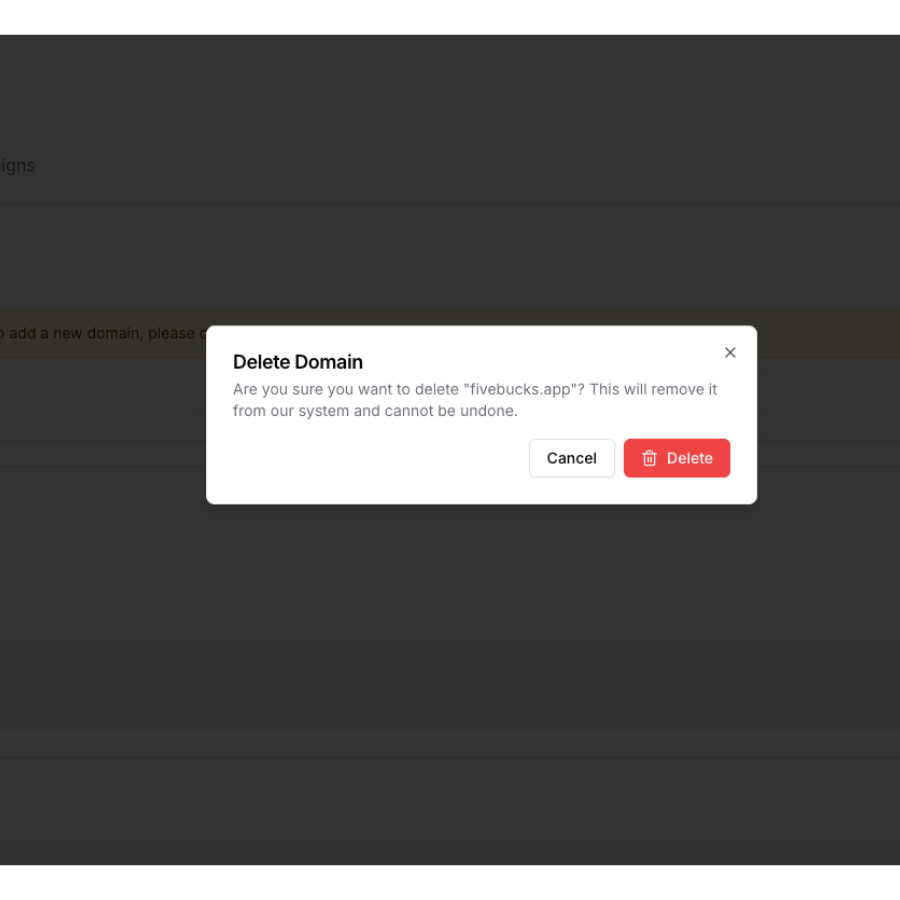
Deleting Domains
To remove a domain you no longer need:
- Click the "Delete Domain" button on the domain card
- Confirm the deletion in the modal
- The system will:
Loading image...
Troubleshooting
DNS Records Not Verifying
Problem: Clicked "Verify Domain" but records still show as "Pending"
Solutions:
- Wait longer for DNS propagation - Can take up to 48 hours for some providers
- Check DNS with online tools:
- Verify exact record values - Copy again from FiveBucks and re-paste
- Check for duplicate records - Some providers don't overwrite; they add duplicates
- Remove domain suffixes - Some providers auto-append your domain to hostnames
DKIM Record Too Long
Problem: DNS provider rejects DKIM record with "value too long" error
Solution: Some providers (especially older ones) have a 255-character limit for TXT records. You need to split the DKIM value:
- Break the DKIM value into multiple quoted strings:
- Or upgrade to a modern DNS provider (Cloudflare, Route53) with no limits
Domain Already Exists Error
Problem: "This domain is already verified in another project"
Explanation: Each domain can only be verified once across all FiveBucks projects.
Solutions:
- Check if you already added it in a different project
- Contact FiveBucks support to transfer the domain
- Use a subdomain instead (e.g.,
mail.yourdomain.com)
Verification Succeeds But Emails Bounce
Problem: Domain shows as verified, but test emails bounce or go to spam
Possible causes:
- Domain warmup in progress - Daily sending limits may be exceeded
- Recipient server blocking new domain - Wait 24-48 hours for reputation to build
- Missing DMARC policy - Add the optional DMARC record for better deliverability
- Sending to invalid addresses - Check that recipient emails are valid
- Email content flagged as spam - Review content for spam trigger words
Solutions:
Start with small test sends to known
good email addresses
Use Mail
Tester.com to check your email's spam score
Monitor bounce reports in the Email Analytics dashboard
Can't Find DNS Management Page
Problem: Can't locate where to add DNS records at your provider
Solutions by provider:
- Cloudflare: Dashboard → Select domain → DNS → Records
- GoDaddy: My Products → Domains → DNS → Records
- Namecheap: Domain List → Manage → Advanced DNS
- Google Domains: My Domains → DNS → Custom records
- AWS Route53: Hosted zones → Select domain → Create record
If still stuck, search for "[your provider name] add DNS record" in Google.