
Content Approvals
Collaborate with your team and clients to review, approve, and publish content through a structured workflow.
What is Content Approval?
Content Approval provides a structured review process for articles, SERP analyses, and content briefs before they go live. Team members can request approvals, assign reviewers, add comments, and track the approval status through an organized workflow—ensuring quality control and client satisfaction.
Before You Begin
- Generated article, SERP analysis, or content brief ready for review
- Team members added to your project
- Understanding of your review workflow (internal only, or include client review)
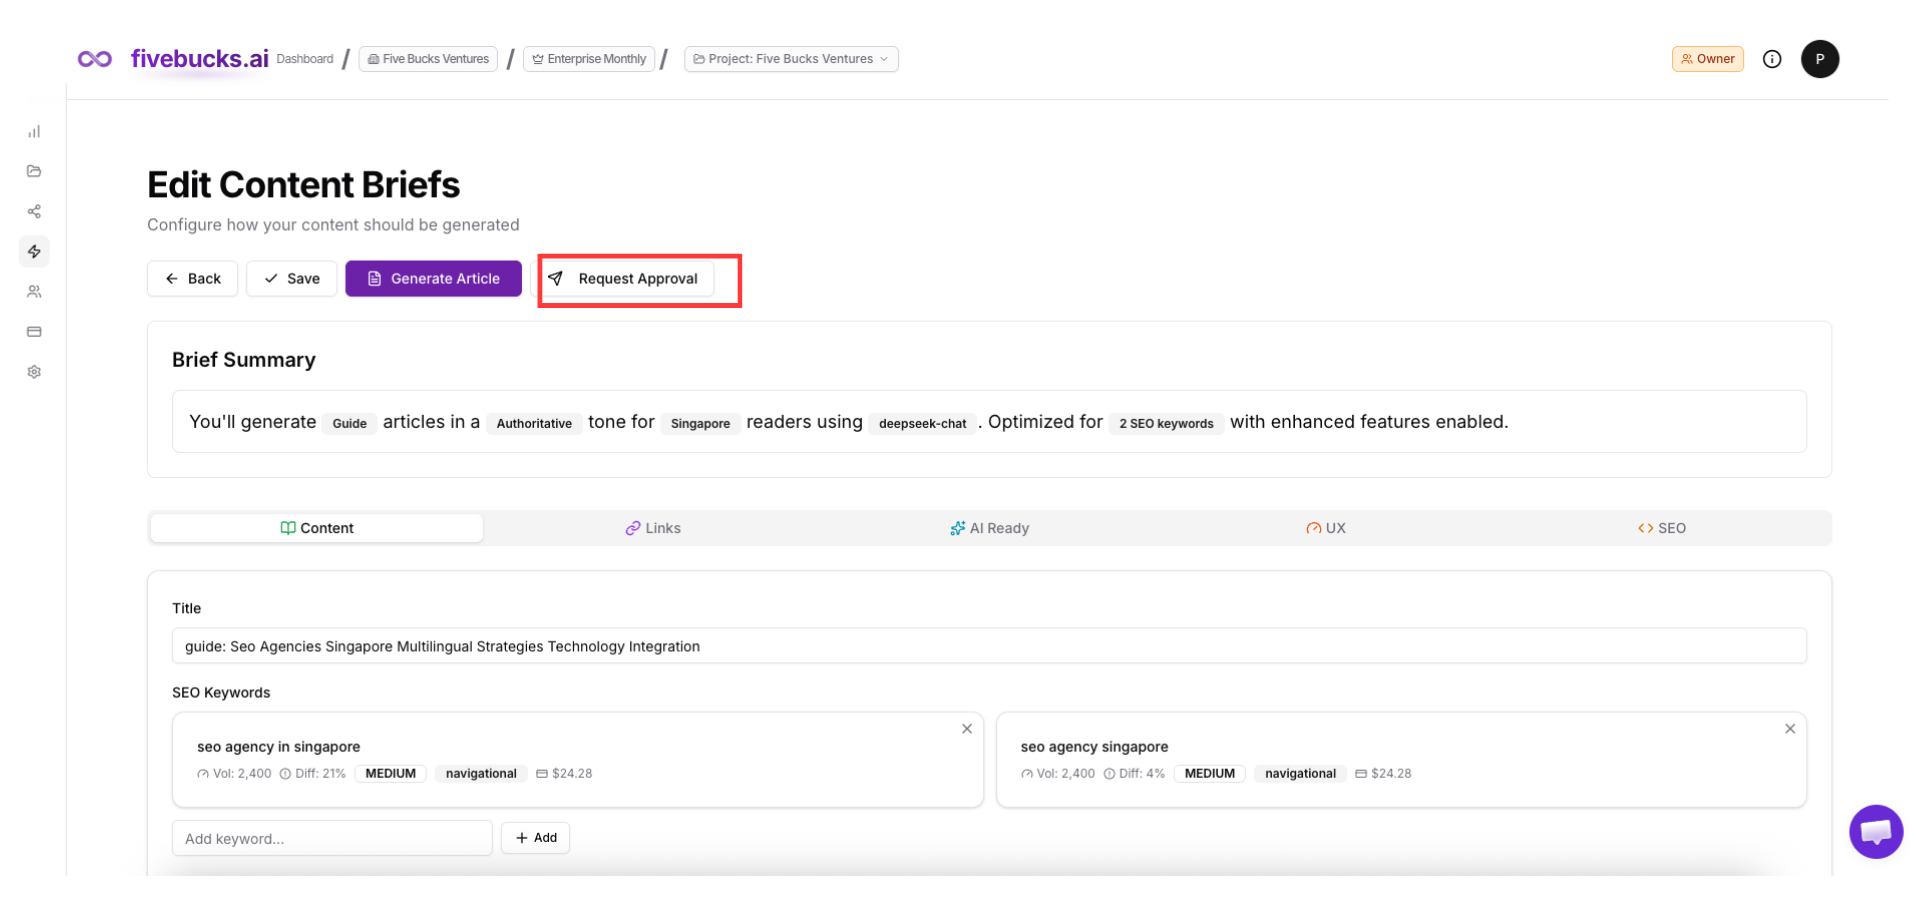
Request Approval from Content
You can request approval from three different locations depending on your content type:
From Article Viewer
When viewing a generated article, click the "Request Approval" button in the top right corner.
From SERP Analysis
When viewing SERP analysis results, click the "Request Approval" button next to the cluster topic.
From Content Settings
When viewing a content brief, click the "Request Approval" button at the top.
Loading image...
Note
Assign Reviewers and Set Priority
A modal will open with two steps. First, assign team members to review the content:
Assign Reviewers
Select one or more team members from your project who should review this content. You can assign:
- Admins for internal quality control
- Editors for content review and edits
- Clients (Viewer role) for final approval
Set Priority
Choose the urgency level:
- Low: No rush, review when convenient
- Normal: Standard review timeline
- High: Important, needs prompt attention
- Urgent: Critical, needs immediate review
Loading image...
Pro Tip
Click "Next: Configure Workflow" to proceed.
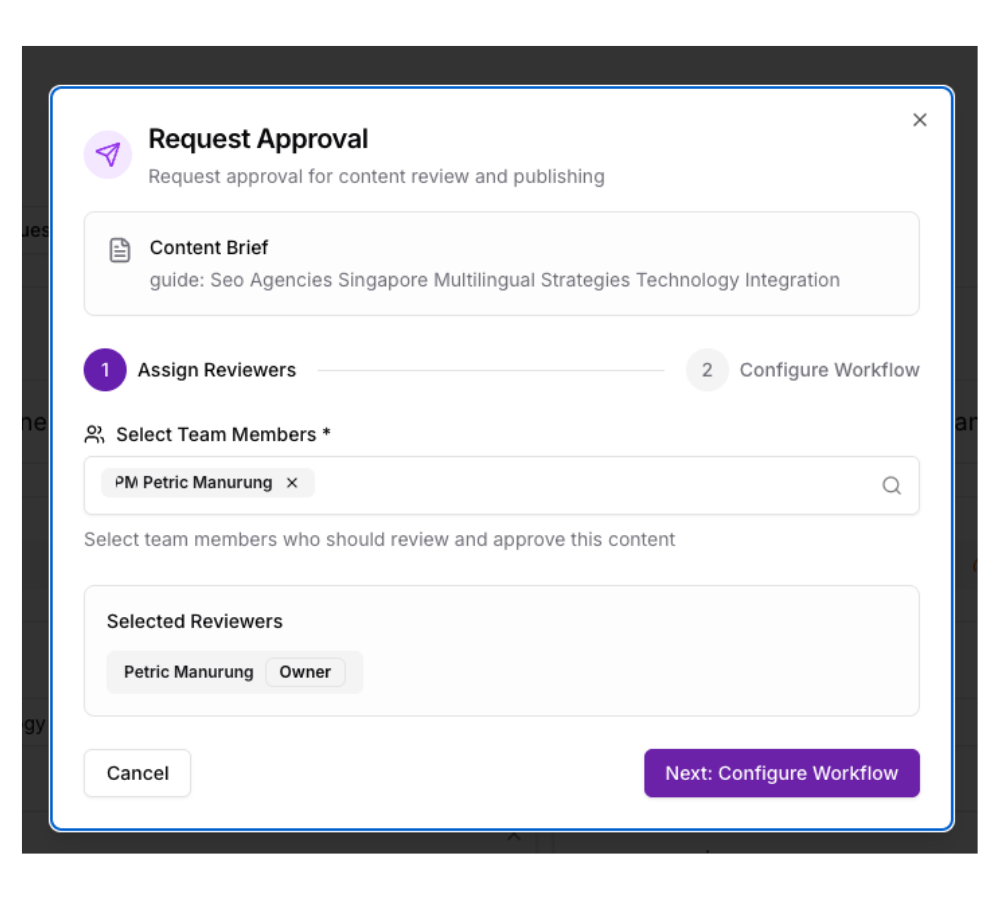
Configure Workflow and Due Date
In step 2, configure the approval workflow:
Due Date
Set when the approval should be completed. This helps track timelines and sends reminder notifications.
Workflow Stage (Optional)
Choose the starting workflow step:
- Pending: Initial state, not yet assigned
- Internal Review: For team review before client sees it
- Client Review: Skip internal review, go straight to client
Loading image...
Note
Click "Send Approval Request" to create the approval. Assigned reviewers will receive email notifications immediately.
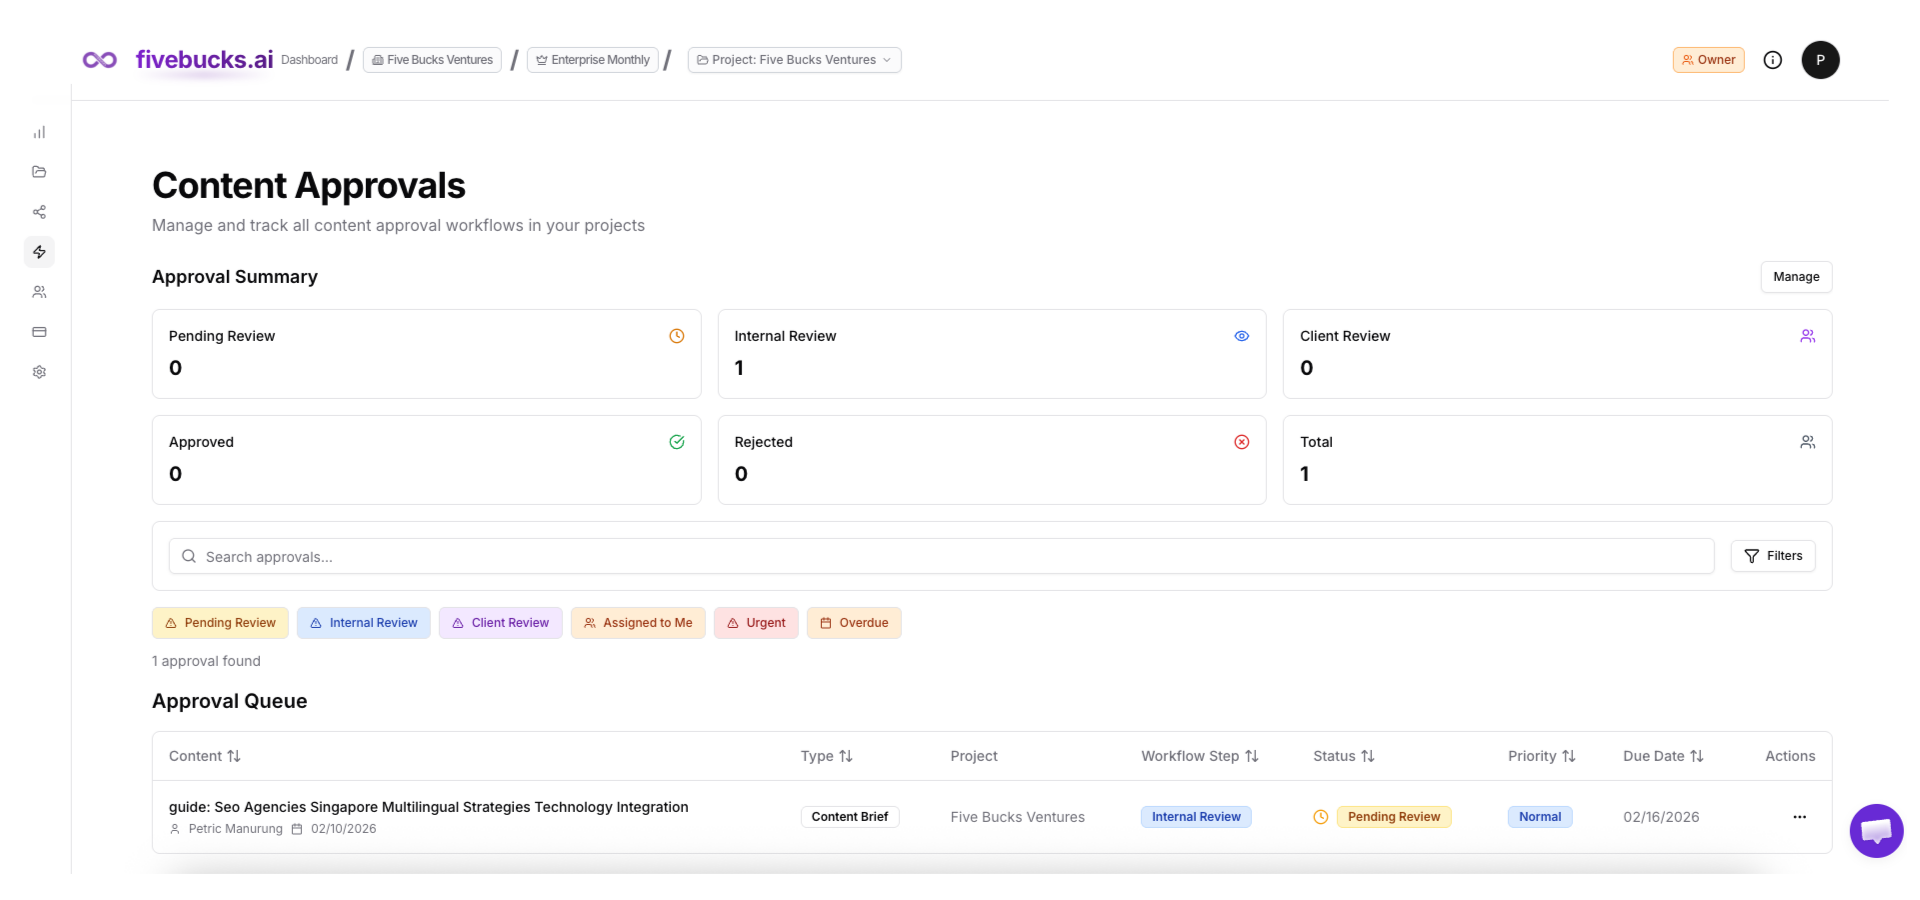
Track Approvals in Dashboard
Navigate to "Content Approvals" in the sidebar to see all approval requests. The dashboard shows:
Filter Tabs
- All: Every approval across all projects
- Pending: Waiting for initial assignment
- In Review: Currently being reviewed
- Approved: Completed and approved
- Rejected: Sent back for revisions
Approval Cards
Each approval displays:
- Content title and type (Article, SERP Analysis, Brief)
- Current status and workflow step
- Assigned reviewer with avatar
- Priority level
- Due date
- Project name
Loading image...
Pro Tip
Click any approval card to open the detailed review interface.
Understanding the Workflow Progress
When you open an approval, you'll see a visual workflow indicator at the top showing four stages:
1. Approval Raised (Pending)
Initial state when approval is created. Content is waiting for first reviewer assignment.
2. Internal Review
Team members (Admins, Editors) review content quality, accuracy, and SEO optimization before client sees it.
3. Client Review
Client or external stakeholders review content for final approval before publishing.
4. Ready to Publish (Closed)
Approval workflow is complete. Content is approved and ready to publish to your website.
Loading image...
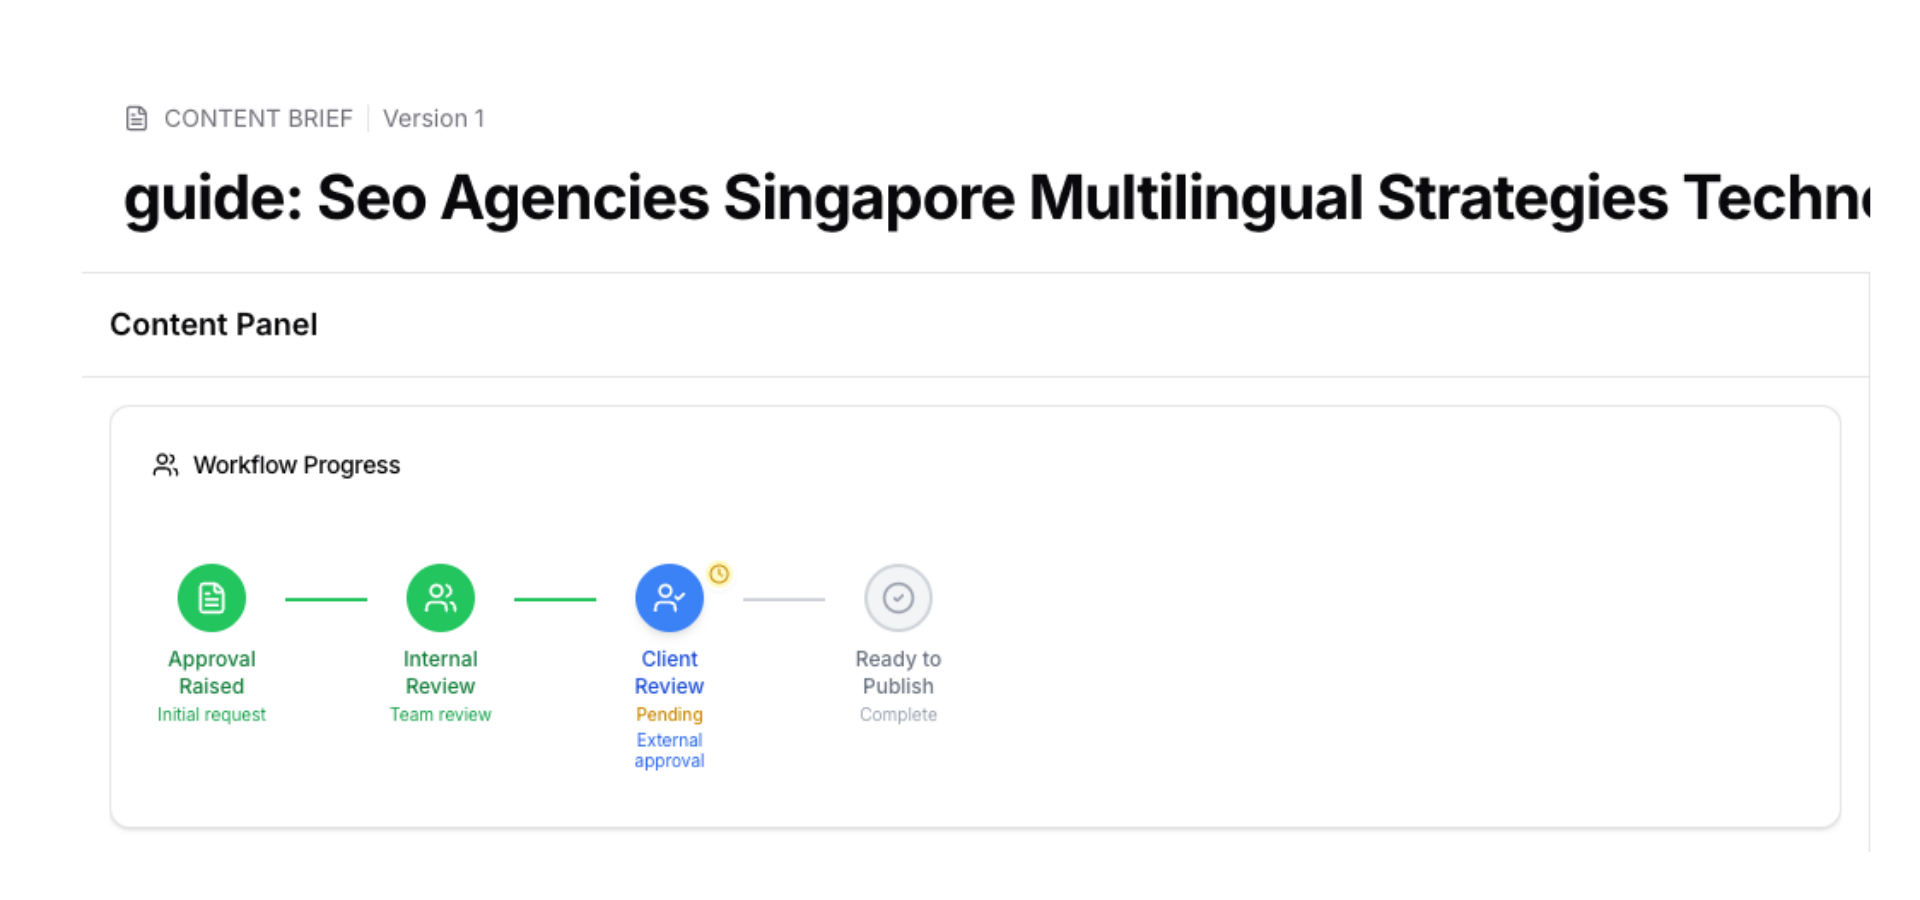
The current step is highlighted in blue, completed steps show in green, and upcoming steps are gray. A status badge on the current step shows whether it's approved, rejected, or pending.
Note
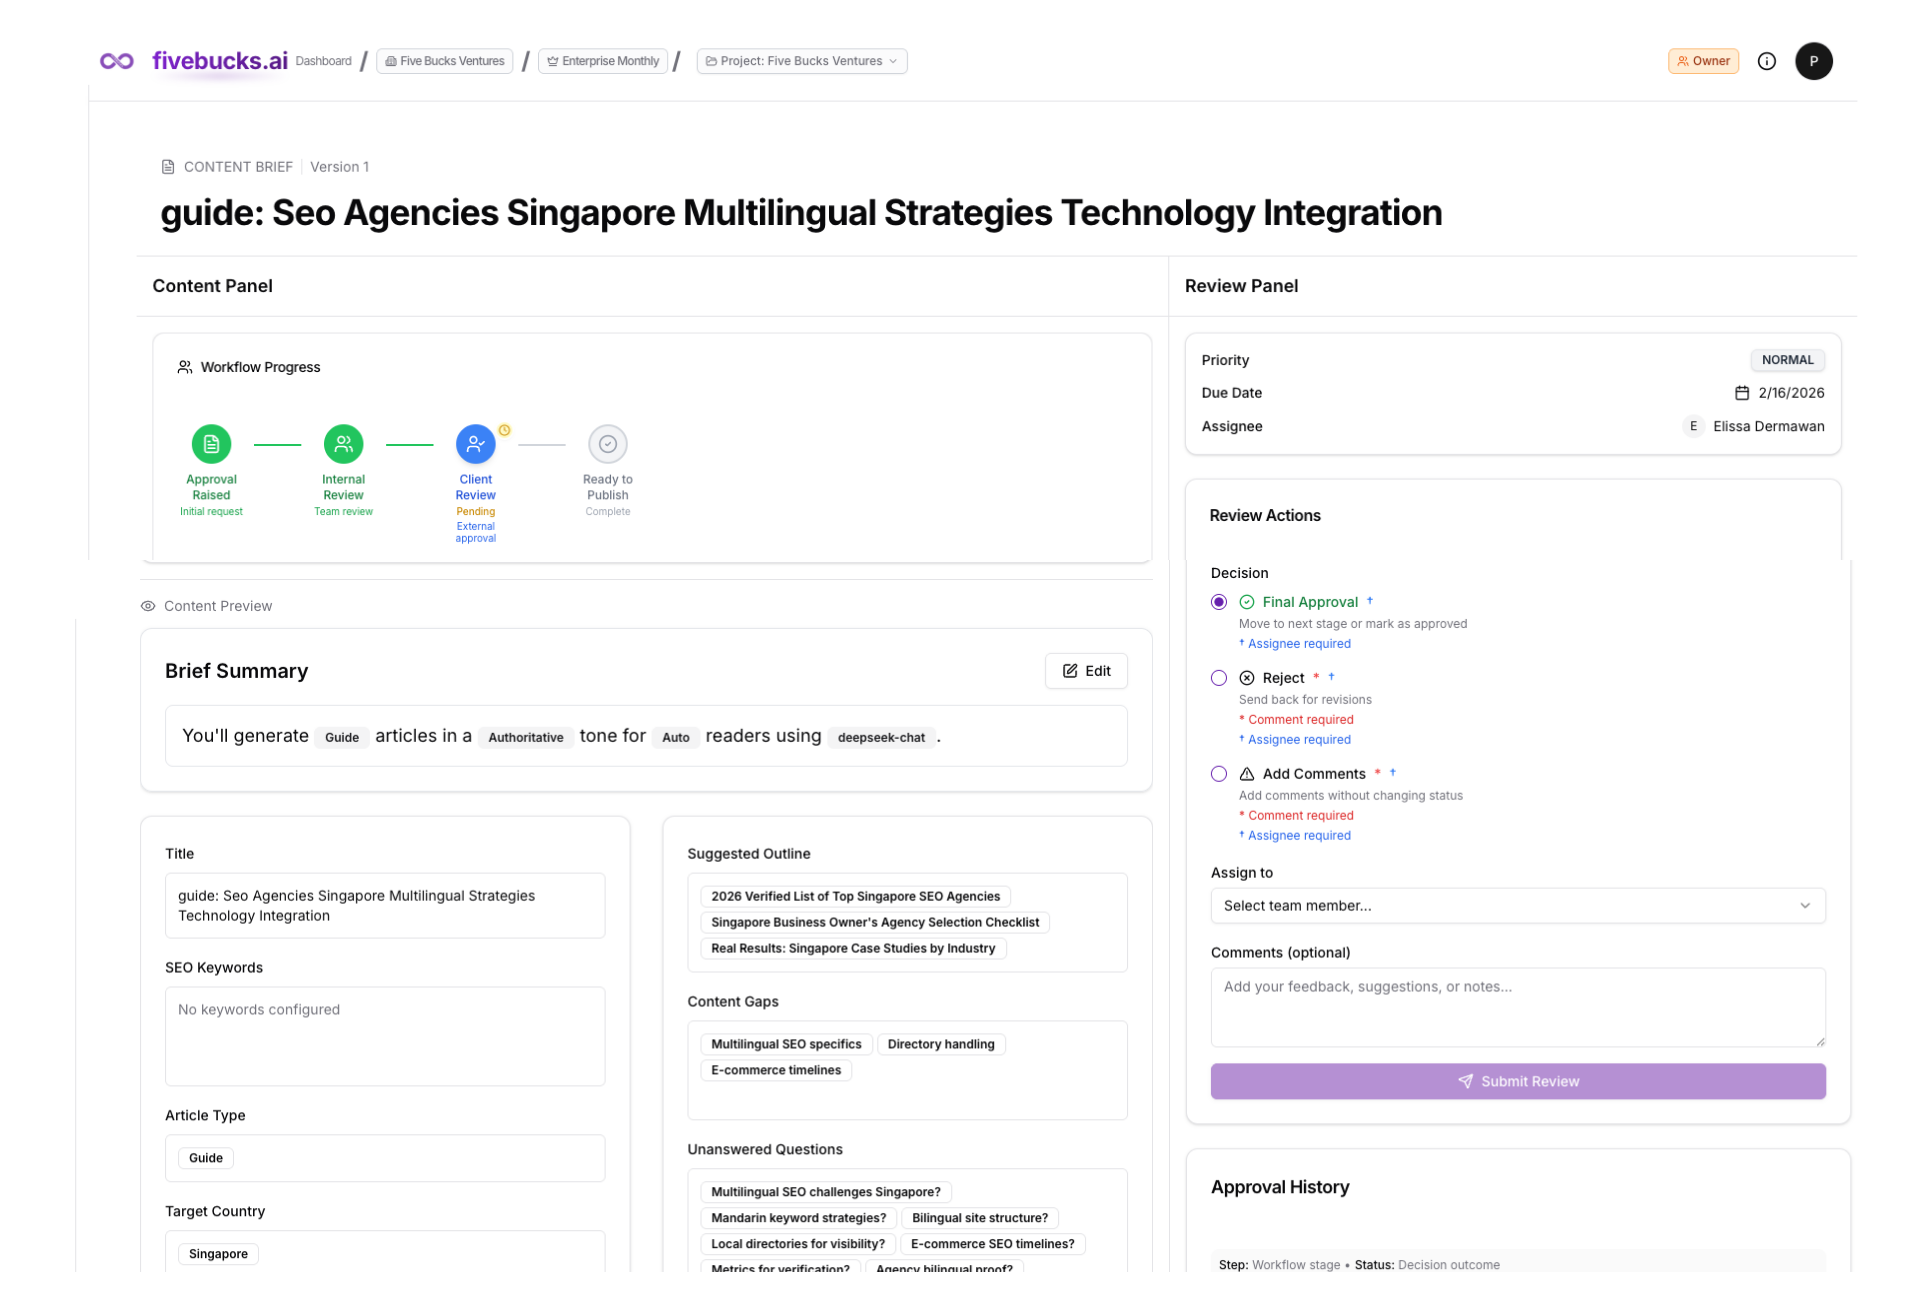
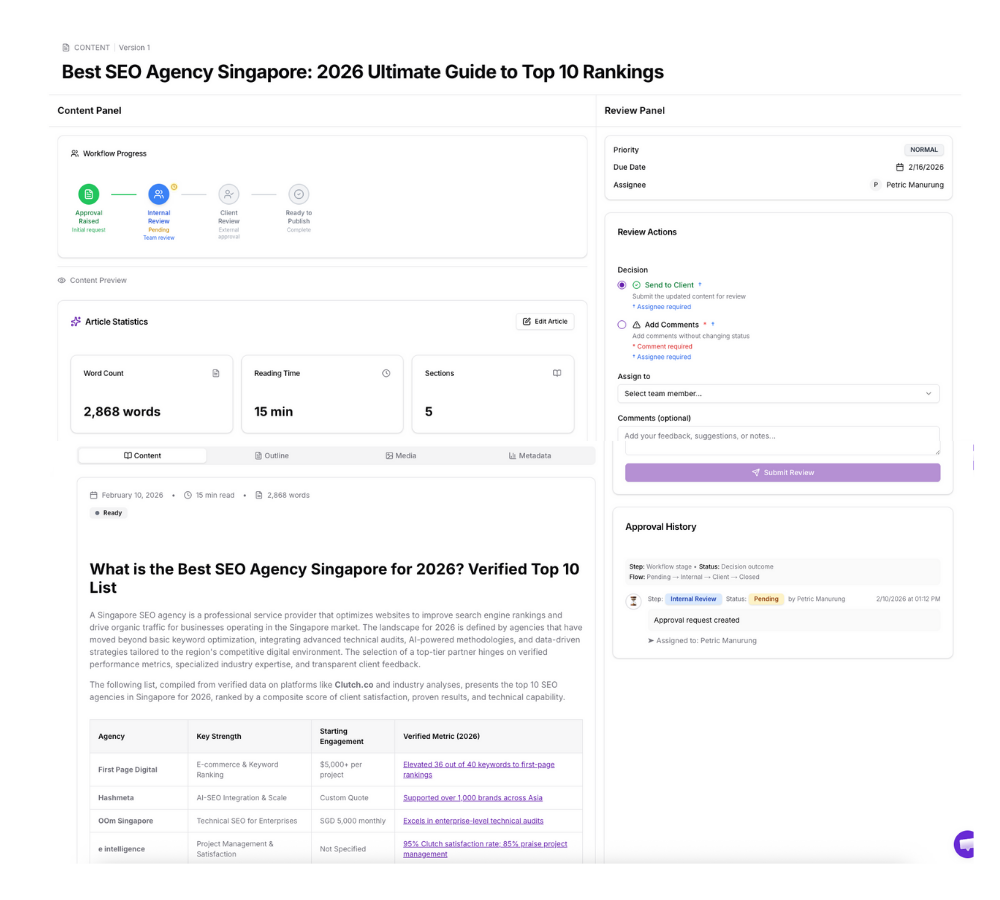
Review Content Interface
The approval detail page has two main sections:
Left Side: Content Preview
Displays the full content being reviewed:
For Articles: Full article text with formatting, images, tables, and links
For SERP Analysis: Analysis results with The Five Ranking Factors tabs
Content, Links, AI Ready, UX, SEO
- For Content Briefs: Complete brief settings including keywords, outline, tone, and SEO parameters
Right Side: Review Panel
Provides review tools:
- Content Info: Priority, due date, current assignee
- Review Actions: Approve, reject, or request changes with comments
- Next Assignee: Select who reviews next
- Approval History: Timeline of all actions and comments
Loading image...
Pro Tip
Taking Review Actions
In the Review Panel, you'll see actions available based on your role and the current workflow step:
Available Actions:
✅ Approve / Submit for Approval / Send to Client
Moves content forward in the workflow. The button label changes based on context:
- Submit for Approval: If you're the author resubmitting after rejections
- Send to Client: If you're an admin approving during internal review
- Final Approval: If you're a client doing final approval
❌ Reject
Sends content back for major revisions. Requires comment explaining what needs to change. Resets workflow to Pending state.
⚠️ Request Changes / Add Comments
Adds feedback without changing workflow status. Use this for minor suggestions or to provide input while keeping approval active.
Loading image...
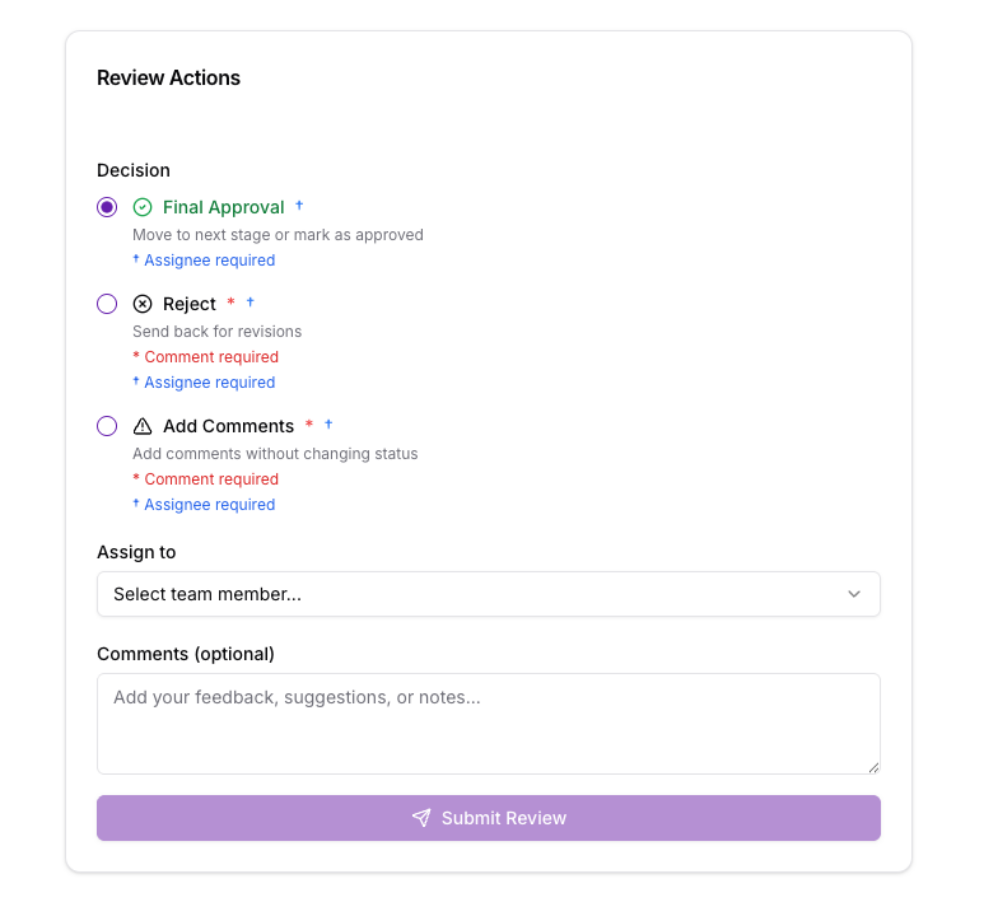
Making a Decision:
- Select Action: Choose the radio button for your decision
- Assign Next Reviewer: Select who should review next (required for all actions)
- Add Comment: Provide feedback (required for reject and request changes)
- Click Submit Review: Your decision is processed and notifications sent
Note
Review Approval History
Below the review actions, the Approval History shows a complete timeline of everything that happened:
What's Tracked:
- Status changes (pending → internal review → client review)
- Workflow step transitions
- Comments and feedback from all reviewers
- Assignee changes (who's reviewing now)
- Timestamps for each action
Loading image...
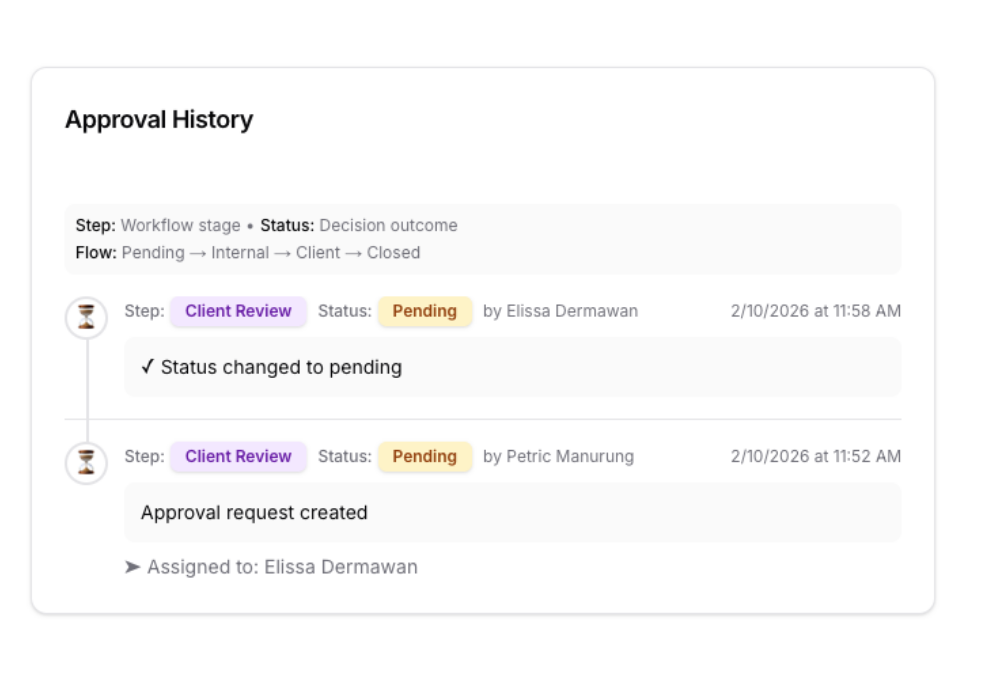
The history is displayed in reverse chronological order (newest first) with:
- Step badges: Show which workflow stage
- Status badges: Show the decision (approved, rejected, pending)
Comment boxes: Display reviewer feedback
Assignee info: Show who was assigned next
Pro Tip
Email Notifications
Everyone involved receives email notifications at key moments:
When You're Assigned
Subject: "Approval Assigned: [Content Title]"
Receive when someone assigns an approval to you for review.
When Status Changes
Subject: "Approval Status Changed: [Content Title]"
Receive when approval moves to a new workflow stage or gets approved/rejected.
When Comments Are Added
Subject: "New Comment on Approval: [Content Title]"
Receive when someone adds feedback without changing status.
When Approval Closes
Subject: "Approval Completed: [Content Title]"
Receive when the full approval workflow finishes.
Loading image...
Each email includes:
- Content title and type
- Project name
- Current status and workflow step
- Reviewer's comments (if provided)
- "Review Now" button linking directly to the approval page
Note
Role-Based Permissions
Different team roles have different capabilities in the approval workflow:
Owner / Admin
Full access to all approval actions:
- Can approve at any workflow stage
- Can reject and reopen closed approvals
- Can reassign to any team member
- Can add comments and request changes
Editor
Limited approval powers:
- Can submit content for approval
- Can respond to change requests
- Can approve during internal review (sends to client)
- Can request changes but cannot give final approval
Viewer (Client)
Client-focused permissions:
- Can only act during client review stage
- Can give final approval or reject
- Can add comments and request changes
- Receives notifications when content reaches their stage
Pro Tip
Mobile Review Experience
On mobile devices, the review interface adapts to a single-column layout:
- Workflow Progress appears at the top
- Content Preview displays in full width for easy reading
- Review Panel appears below with all actions
- Floating Action Buttons provide quick access to approve/reject from anywhere on the page
Loading image...

All review capabilities are available on mobile—you can review articles, add comments, approve, or reject from your phone.
Note
Content Preview by Type
Depending on what you're reviewing, the content preview shows different information:
Article Preview
Shows six tabs:
- Content: Full article with markdown formatting
- Structure: Table of contents and heading hierarchy
- Images: All images with alt text and DALL-E prompts
- YouTube: Embedded video suggestions
- External Links: All outbound links with context
- Tables: Structured data tables
Loading image...
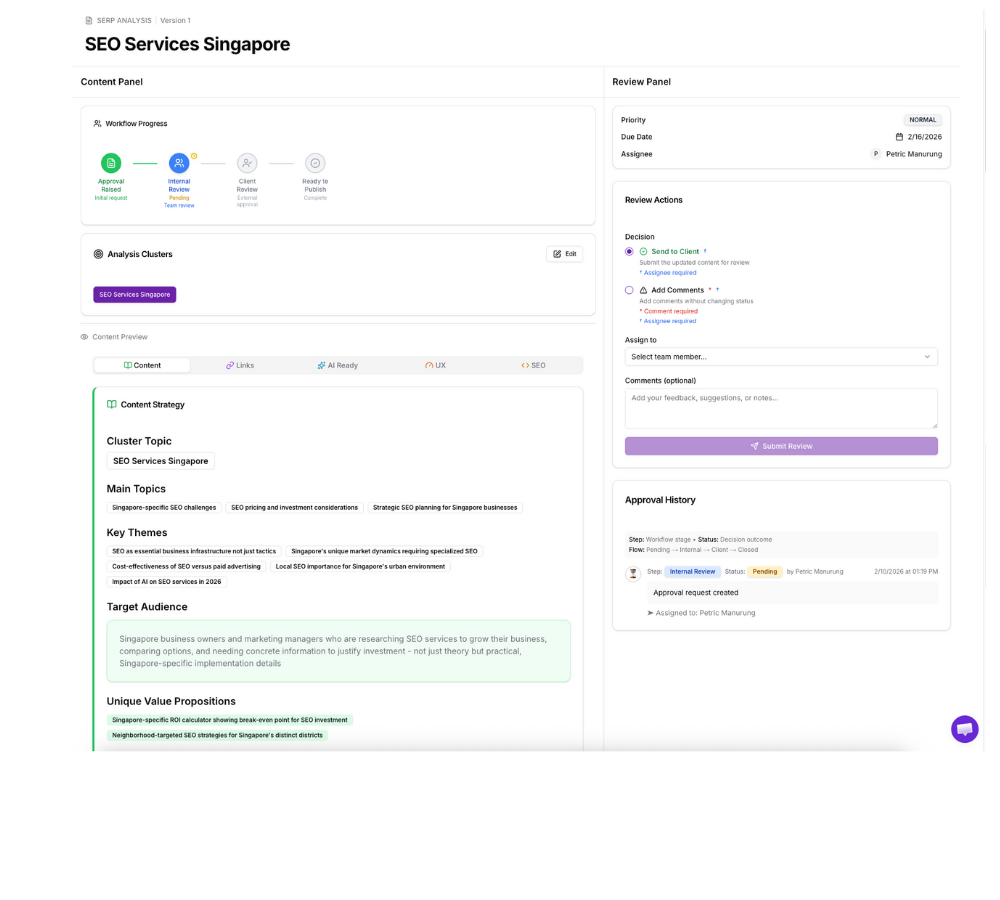
SERP Analysis Preview
Shows The Five Ranking Factors:
- Content: Main topics, key themes, content gaps, questions, opportunities
- Links: Internal and external link recommendations
- AI Ready: AI optimization score, schema markup, featured snippets
- UX: Reading level, mobile optimization, page speed
- SEO: Technical SEO checklist, meta tags, URL structure
Loading image...
Content Brief Preview
Shows two-column layout:
- Left: Title, SEO keywords, topic, slug, language, country
- Right: Article type, tone, point of view, reading level, model, word count
- Summary: Auto-generated sentence describing the brief configuration
Common Workflows
Scenario 1: Simple Internal Approval
- Editor generates article
- Editor requests approval, assigns to Admin
- Admin reviews, approves (sends to client)
- Client receives notification, reviews, gives final approval
- Article moves to "Ready to Publish"
Scenario 2: Revision Cycle
- Editor generates article
- Editor requests approval, assigns to Admin
- Admin reviews, rejects with comments about needed changes
- Editor receives notification, makes edits
- Editor resubmits for approval, assigns back to Admin
- Admin approves, sends to client
- Client gives final approval
Scenario 3: Skip Client Review
- Editor generates article
- Admin reviews internally, decides client review not needed
- Admin marks as "Final Approval" without assigning to client
- Article moves directly to "Ready to Publish"
Pro Tip